Pages
▼
Wednesday, April 29, 2009
Rainy Days and Sewing
Rain, rain, go away
Come again another day
Little Emmy wants to play...
...in her new summer clothes that she can't wear until it warms up. :)
The Top:
Ottobre 02/2005
Blouse, Design # 11
Size 98, lengthened 3 inches
Fabric: Batik cotton leftover from a skirt for my 2nd daughter and leftover from two purse linings. This blouse used up all but the tiniest of scraps.
The batik fabric has just enough of the right color of green in it to coordinate with the green shorts. My favorite part---the two rows of shirring across the front, sewn with elastic thread in the bobbin.
The Shorts:
Ottobre 16/2008
"Goofy Tweed Pants," Design # 11
Size 92
The pattern photo shows pants made of wool tweed. I cut the lower legs off the pattern piece and made a pair of shorts in lime green cotton twill, topstitched in pink.
Saturday, April 25, 2009
Kerttu -- Little Summer Dress
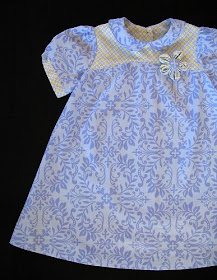
The dress is "Kerttu" from the 1/2009 issue of Ottobre. It was meant to be tunic length, but I made it into a dress for little Miss Emily, who by the way, will turn 4 years old next week.
When I first saw this pattern in the magazine, it did not appeal to me, especially as shown as tunic length. After seeing a few other photos made up in dress length, it came to me that this pattern would be perfect for a loose, cool, and comfortable dress for Emily during the coming hot Oklahoma summer. (For other pictures, search "kerttu tunic" or "kerttu ottobre" on flickr.com).
In a size 98, the dress is plenty big enough for Emily. The floral fabric is a poly/cotton blend, the weight of broadcloth with a tight weave. The turquoise gingham has been in my fabric collection for at least 20 years. As one person on Pattern Review commented, "the gingham waited 20 years to find it's floral mate." I like that!
The full review can be found here at patternreview.com.
Cocoa, one of the resident Border Collie dogs wanted some attention.
The photo in the Ottobre magazine:
Thursday, April 23, 2009
Butterick 4560 Diaper Bag Pattern Review
I've actually been using this diaper bag for about 5 months now, but I'm just now getting around to posting about it. When I was starting to sew it, I couldn't find many pictures or reviews of this pattern, so I wanted to be sure and share it here for future diaper bag sewers.
Butterick 4560. Overall this pattern was well written and easier to follow then I thought it would be. I went slowly and followed each step. One major issue is that the directions don't have you put on the velcro to close it till the very last step. At that point I had to sew through all layers of the top flap to attach the velcro. It doesn't look too bad, but if you didn't want your stitches showing on the front of the bag, then the velcro should be attached to the flap lining before the flap is sewn onto the bag.
I made a few major changes. I thought the bag looked a bit tall for my tastes, so I cut off two inches from the height. That was a bit of work because I had to take off two inches from almost every pieces including the lining pieces and most of the pockets.
The pattern called for fusible fleece to add body and stabilize the bag. I didn't want the puffiness of fleece, so I used a heavy canvas instead(part of an old mail bag I got from a garage sale, actually). Because I couldn't fuse the canvas like the fusible fleece, I basted it to the wrong side of the outer pieces before I began to construct the bag. I then treated those pieces as one.
I liked the effect the canvas gave it, but next time I wouldn't use quite as thick and heavy of canvas...it was extremely hard to sew through the multiple layers even with my Pfaff machine. I did use the sz. 100 needle and that helped, but it was still tricky, and my seams across the top of the bag aren't as neat as I normally like.
The handle was way too long. I shortened it and I omitted the handle pad as I thought it was unnecessary for this size of bag.
I love all the pockets! They have been great. I did use fusible interfacing to give body to the one outside pocket with the flap. It turned out great. For the base of the bag I actually stitched two layers of peltex to the bottom lining piece, then sewed the lining together and continued as normal. I did also have a layer of my canvas sewn to the outer base piece, so the bottom is pretty stable, yet still flexible.
I've been using this bag for 5 months now and it's held up really well and still looks great. I feel quite stylish having a unique bag and fits my personality and needs. I would recommend this pattern, absolutely!
Blessings,
Jessica
Wednesday, April 22, 2009
Getting in on a quilt festival...
I'm a bit late, but not too late to be joining in on the Spring 2009 Quilt Festival at the Park City Girl blog. There are soooo many pretty quilts and quilt inspiration if you take time to browse the links....also a bunch of fun prizes to be drawn on the 24th. If you have a quilt you want to share, hurry, and join in before the festival closes!
I LOVE to make baby quilts. They are easy, and quick, and a great way to try fun fabric combinations without having to spend a lot of money or commit to weeks of sewing. My favorite baby quilt that I've made is this green and blue one from last summer. It was made from Denyse Schmidt's Katie Jump Rope fabrics and I had a hard time giving it away! I know the little man who now owns it though, and he certainly deserves it. Don't all babies though? I hope to make each of my kids their own special quilt.
Blessings!
Jessica
Monday, April 20, 2009
Fat Quarter Purse
When I saw this cute purse pattern at wewilsons.blogspot, I decided that it would be the next purse I sewed. The purse is made from just 2 fat quarters. The purse, however, is smaller than I like, so if Ellen claims this, it's hers (let's see if she reads her mama's blog). Because I do like the style and shape, I may try enlarging the pattern and making another for me. We'll see.
lots of pictures here---including a picture tutorial of how I made the inside zippered pocket:
The instructions did not call for this, but I used an inner layer of canvas to give more body to the bag. I used canvas in the straps as well.
The instructions also did not call for an inside pocket, but I absolutely *need* at least one inside pocket in my purses. For the pocket, I cut two rectangles the same size as well as 2 layers of interfacing which I fused to the wrong side of the pocket pieces.
I used a vintage metal zipper from my stash, but since it was too long I had to use needle-nose pliars to shorten the zipper. It's fairly easy to just grab the metal zipper teeth one at a time and pull them off the zipper tape.
After deciding how long to make my pocket opening, I drew a rectangle on the wrong side of one pocket piece and then proceeded to sew the pocket to the purse lining, right sides together, and sewing on the drawn lines.
Next, I cut a slit through both fabric layers, clipping to the corners, and being careful not to cut through the stitching line.
I didn't take a picture of this step, but I pulled the pocket through to the wrong side of the lining and ironed it down. This takes some work to get the pocket to lie flat, but it is possible.
Wonder Tape-- this is great stuff! It is sticky on both sides, and you can sew through it without gumming up your machine. You can see where I applied the tape to both long edges of the zipper. Next I peeled the paper backing off and laid the zipper in place underneath the pocket opening.
To finish the pocket, I topstitched close to the edge of the rectangle opening. The wonder tape held the zipper firmly in place with no shifting---gotta love it!
Lastly, on the wrong side of the lining, I placed the second pocket piece against the first pocket piece, right side to wrong side and sewed around the edges. While sewing the 2 pocket pieces together, I had to be careful to hold the lining piece out of the way and sew only the pocket pieces. The pocket ends up with a clean finish on the inside, and the only stitches to be seen are around the zipper opening.
Friday, April 17, 2009
Little Flowers
One for her hair, and one for her dress....
Whenever I make a "brooch" or decorative item to add to a garment, I like to attach it to the garment with a safety pin or pin-back instead of sewing it directly to the garment. This way the brooch can be taken off the dress before sending it through the laundry.
The "Baby Deer" dress I sewed last fall has been through the wash countless times, but the flower embellishment still looks great because it is detachable.
Wednesday, April 15, 2009
Oliver + S Dress
The Dress: Oliver + S "Puppet Show"
Size 3, lengthened to a size 5
Close-up of the Front: Take a look at the topstitched darts.
The Flower Brooch was made following Cindy's tutorial at sew-blessed.blogspot. This sweet flower is the perfect touch for an otherwise simple dress.
I also made a second flower for Emily's hair.
The Flower Brooch was made following Cindy's tutorial at sew-blessed.blogspot. This sweet flower is the perfect touch for an otherwise simple dress.
I also made a second flower for Emily's hair.
The Under Slip: My own pattern design. The back has a placket with a snap. The neck and armholes are finished with a shell stitch.
Tuesday, April 07, 2009
Cathdral Window Quilt Giveaway
One of our blog friends, Cheryl, from Quilting Memories For Tomorrow is celebrating her 100th post with a giveaway! She recently took up cathedral window quilting and is giving away a cathedral window quilt book and a handmade pincushion with this beautiful (and complex looking!) design. Click on over to her blog for a chance to win these lovely gifts.
Thanks for letting us know about your giveaway, Cheryl! I hope I win. =)
Blessings,
Jessica
Saturday, April 04, 2009
Red Booties on the Baby
My grand baby is such a sweetie! I finally got a picture of her wearing the red booties that I knit a few weeks ago. Her chubby legs are adorable---I just have to share a few snapshots here.
~ Ruth ~
~ Ruth ~
Friday, April 03, 2009
Gulp...
Yikes, I just spent all of my birthday money on fabric...
Fabric for baby dresses, fabric for a couple gifts, and fabric to love (not sure what it'll be yet!) Now I am anxiously awaiting for it to arrive.
I found a new fabric shop to order from, Bee Square Fabrics, and was thrilled to find out that they were having a big moving sale--35% off all regular priced fabrics. Click on the link to get the coupon code and go shopping!
Blessings,
Jessica
Wednesday, April 01, 2009
Zippety do da
I want to make Emily a dress, but I can't decide on a pattern for this lovely fabric. The fabric is a sheer woven---not sure what it's called, but it has raised little nubby bumps. Almost like dotted Swiss; perhaps a voile? I think it is dotted Swiss; I was in Hancocks today and saw some very similar fabric. But it's definitely different than some vintage dotted Swiss in my stash. I really should be more educated about fabric types, lol.
I've been searching through the Ottobre line drawing that Teri has put together at Evernote, and I just am not sure what style of dress to use with this fabric. Any suggestions? I'm thinking perhaps something with full gathered skirt. Hmm...just had a thought--maybe I'll search through my old vintage patterns and see if I can come up with something. I'll keep you posted.
In the meantime, below is a picture of the top I finished yesterday. This should have been an easy, quick to sew shirt, but due to lack of sewing time, it's taken about 6 days to finish. The pattern I used is Simplicity 3790, View E. I think I'm really going to like this top; it promises to be comfortable and roomy without looking like a maternity shirt.
Ruth