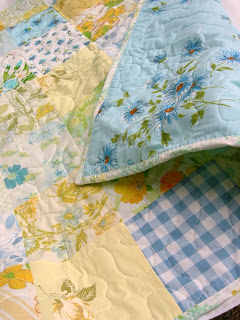
Today I finished this quilt for a good friend who is having her first baby...just in time, as the shower is tomorrow!
This was my first time to do a stripe quilt like this. Has anyone else here done one of these? I would love any tips...I had trouble with my stripes stretching or something and the whole thing wasn't square when I was done. I cut all my selvages even on one end of each strip and then sewed them all together starting at the top and all starting at the same end. I think it might have been better to start in the middle and sew each one on from the opposite end. I had to do major trimming afterward to get the quilt top somewhat rectangular. Any thoughts??
I did the binding on this one by machine with a blanket stitch and really liked how that came out. It was much nicer looking then the zig-zag stitch. Not as nice as sewing it down by hand, but I was running out of time.
I think my machine stippling is getting better...overall, I was very pleased. I hope my friend likes it!!
Have a great weekend!
Jessica
Pages
▼
Friday, September 25, 2009
Thursday, September 24, 2009
Vintage Linens Baby Quilts, Blogreader Special
In the next week or so I am going to be listing these vintage linens baby quilts in my etsy shop. I thought first though that I'd offer them to our blogreaders for at special price in case any of you have fallen in love with vintage sheets as much as I have and but don't have the time to collect the materials and sew one up for yourself.
These each measure 33 inches by 39 inches and are made from 100% vintage sheets and linens. The quilt top and backings are layered with a polyester batting and they are each machine quilted in a slightly different pattern and the bindings are sewn on with a zig-zag stitch. They are super soft and so pretty...perfect for a special baby gift.
I have 7 available and they are $42 each plus $6.00 for priority shipping. That is $10 less then I plan to list them for on etsy. If you are interested, shoot me an e-mail with the number of the one you want! I also have more pictures of each available if you want to take a closer look at a particular one.
Jessica
www.sewchicgirl {at} gmail.com
No.2
Pinks and blues with blue backing
No. 3
Pastel greens, blues, yellows and whites with pastel multi backing
No.4
Oranges and yellows with soft white and yellow roses backing
No. 5 Pinks and soft greens with pastel green multi backing
No. 6
Blues and yellows with blue backing
No. 7
Oranges and yellows with yellow backing
These each measure 33 inches by 39 inches and are made from 100% vintage sheets and linens. The quilt top and backings are layered with a polyester batting and they are each machine quilted in a slightly different pattern and the bindings are sewn on with a zig-zag stitch. They are super soft and so pretty...perfect for a special baby gift.
I have 7 available and they are $42 each plus $6.00 for priority shipping. That is $10 less then I plan to list them for on etsy. If you are interested, shoot me an e-mail with the number of the one you want! I also have more pictures of each available if you want to take a closer look at a particular one.
Jessica
www.sewchicgirl {at} gmail.com
No. 1
Pinks and yellows with pastel yellow backing
No.2
Pinks and blues with blue backing
No. 3
Pastel greens, blues, yellows and whites with pastel multi backing
No.4
Oranges and yellows with soft white and yellow roses backing
No. 5 Pinks and soft greens with pastel green multi backing
No. 6
Blues and yellows with blue backing
No. 7
Oranges and yellows with yellow backing
commercial break...
Swagbucks...I know it sounds kind of cheesy, but it's kind of fun...Since I started using Swagbucks 5 months ago, I've earned $45 in amazon gift cards --completely free, with no strings attached....now if only Amazon sold fabric, then I'd be really happy!
So what is Swagbucks? It's a search engine (powered by Google and Ask) that randomly rewards your searches with "swagbucks", basically points which you can save to redeem for amazon gift cards or other stuff in the swag store. I'm sure you do internet searches everyday anyway, why not earn something from them??
That's all there really is to it--just do your normal seaches on the Swagbucks search engine instead of your normal search engine. Win swagbucks every day and then redeem them for cash!
Find out more, and sign up HERE. When you sign up using any of these links, I'll get referral points too. Then when your friends sign up using your referral link, you'll get even more swagbucks too!
Cheers!
Jessica
Friday, September 18, 2009
Two Quilts
A new quilt for my bed---and I'm not sure I like the colors anymore. :) I finished the top some three years ago or so, when I liked blue and yellow together. Now I'm not so sure. The quilt is bright. Very sunshiny bright. I may put it up and bring it out next spring. The quilt pattern is called "The Yellow Brick Road," and I remember it was a fun pattern to piece together.
I had planned to quilt this myself, but when my neighbor and friend asked for quilt tops to "practice" on, using her new long-arm quilting machine, I gladly gave her this. (Otherwise, it would still be waiting another 3 years or more for me to quilt it). Debbie used a floral pantograph quilting design, and I love it! Her work is exceptional! I told her she doesn't need practice; she's already a pro. And she's open for business if you're in need of quilting. :-)
Debbie also quilted Emily's Vintage Sheet Quilt using a free motion floral design that I think is absolutely perfect for this quilt. I decided to put the quilt on my rarely-used dining room table for a few weeks so that I can enjoy it every time I walk by. This quilt makes me happy!
happy sewing,
Ruth
Tuesday, September 15, 2009
Top 10 Advanced Machine Features
I saw this on TrueUp this morning, and thought it was really interesting.
Top 10 Advanced Machine Features
My Pfaff 1474 has 4 of the top 10 features, the needle up/down button, the needle threader, speed control button, and an advanced feed system (the duel feed, different then what they show on the Janome machine).
Oh to have some of these features though... imagine an automatic thread cutter!! That would be pretty sweet.
I'm really happy with my machine, it's a workhorse, but a girl can still dream, right?
Jessica
Friday, September 11, 2009
She's a winner!
Many congratulations to Mom...she's too embarrassed to mention it, but she won 14 blue ribbons at her county fair this week!
You can see a photo of a couple of her entries HERE.
Love you, Mom!
Jessica
Wednesday, September 09, 2009
Emily-na Ballerina
A few weeks ago, Emily watched an Angelina Ballerina video, and she hasn't stopped dancing ever since.
The tutu is my own pattern. No pattern, really, just 4 yards of tulle, 1 yard of sparkly organza, and 1 yard of ribbon. The top is design #5 from the 03/2008 issue of Ottobre, and it's made from stretchy crushed panne fabric. I tell you, panne is not fun to sew. It slides around, it curls up, it doesn't like my serger. This simple top should have taken less than half an hour to sew, but it took much longer. :-(
I love watching my little ballerina at work. She's so intense, but so carefree when she flitters around. Ah, the life of a child....
Ruth
Tuesday, September 08, 2009
Pink Hoodie for Fall
Jacket: Ottobre 04/2007 design #16 "Girls Hooded Jacket"
Pants: Ottobre 01/2008 design #19 "Jump Sweatpants"
Not much sewing has happened at my house this past month, but I finally made it up to my sewing room this week and made Emily an outfit. It is still warm here, but I want to be prepared with at least one outfit for when the weather turns cooler.
The patterns, of course, came from Ottobre, and the sweatpants are from a pattern I made last year. This time, I traced the pattern 2 sizes bigger than before. According to her measurements, Emily wears a European size 104. I made both the jacket and pants a size 110 so that she won't outgrow them before she has a chance to wear them. So, yes, the outfit is a somewhat big on Emily right now.
Now that I've started sewing again, I hope the momentum will continue. For now, I'm off to round up a few garments to enter into the county fair tomorrow.
Ruth
I made a casing for the elastic gathering on the jacket pockets.
Also, I added 1" elastic to the waistband of the pants.
The "drawstring" is just tacked on the front.
Also, I added 1" elastic to the waistband of the pants.
The "drawstring" is just tacked on the front.
p.s. Thanks to Ellen, my 13 year old photographer.
She did a great job with an uncooperative 4-year-old sister.
Friday, September 04, 2009
How to make cute burpcloths...
My cousin, Bonny, asked...
In my experience, prefold diapers make the best burp cloths for babies! They are just so absorbent and are designed to hold up in the wash time after time. After a while they can get kind of grungy looking though, so lots of people personalize or decorate them in some way with ribbon or fun fabric.
I don't have how-to photos, but the ones I make are really easy. I cut a rectangle of cute fabric (or flannel for even more softness and absorbency!) 1 to 2 inches longer then the length of the burp cloth and 1 inch or so wider then I want it to be on my burpcloth. I iron in the sides and one of the ends of the rectangle about 1/2 inch and then pin it on the cloth diaper all the around those 3 sides. I fold under and press the end that I didn't press before once I have it in place on the cloth diaper so that I get the correct length for that particular cloth diaper. Sometimes they vary slightly, so that's why I do the last end once I've already got the other end and sides pinned in place. Then I topstitch with a straight stitch all the way around, removing pins as I go.
Make sense? Ask me if you have any other questions!
Here are a bunch of links with different ideas for decorating burpcloths.
http://chickpeastudio.typepad.com/chickpea_sewing_studio/diaper-burp-cloth-tutoria.html (this first one is just like how I do mine, only she has photos!)
http://www.makeandtakes.com/baby-burp-cloth-tutorial
http://www.jcarolinecreative.com/Merchant2/merchant.mvc?Store_Code=JC&Screen=BURPCLOTH
http://sewshesews.wordpress.com/2009/07/29/burp-cloth-tutorial/
http://createstudio.blogspot.com/2009/06/two-sided-burp-cloth-tutorial.html
Love,
Jessica
PS. Most likely you found this post though a web search...well, when you search with Swagbucks, you can actually earn points and use them to get Amazon gift cards (among other things). I've been using all my free amazon money to buy sewing and crafty books. =) Check them out!
"How do you make your burp cloths? I have 12 prefold diapers that I want to turn into cute burp clothes, but I'm not sure how to do it and I need some cheap ideas."
In my experience, prefold diapers make the best burp cloths for babies! They are just so absorbent and are designed to hold up in the wash time after time. After a while they can get kind of grungy looking though, so lots of people personalize or decorate them in some way with ribbon or fun fabric.
I don't have how-to photos, but the ones I make are really easy. I cut a rectangle of cute fabric (or flannel for even more softness and absorbency!) 1 to 2 inches longer then the length of the burp cloth and 1 inch or so wider then I want it to be on my burpcloth. I iron in the sides and one of the ends of the rectangle about 1/2 inch and then pin it on the cloth diaper all the around those 3 sides. I fold under and press the end that I didn't press before once I have it in place on the cloth diaper so that I get the correct length for that particular cloth diaper. Sometimes they vary slightly, so that's why I do the last end once I've already got the other end and sides pinned in place. Then I topstitch with a straight stitch all the way around, removing pins as I go.
Make sense? Ask me if you have any other questions!
Here are a bunch of links with different ideas for decorating burpcloths.
http://chickpeastudio.typepad.com/chickpea_sewing_studio/diaper-burp-cloth-tutoria.html (this first one is just like how I do mine, only she has photos!)
http://www.makeandtakes.com/baby-burp-cloth-tutorial
http://www.jcarolinecreative.com/Merchant2/merchant.mvc?Store_Code=JC&Screen=BURPCLOTH
http://sewshesews.wordpress.com/2009/07/29/burp-cloth-tutorial/
http://createstudio.blogspot.com/2009/06/two-sided-burp-cloth-tutorial.html
Love,
Jessica
PS. Most likely you found this post though a web search...well, when you search with Swagbucks, you can actually earn points and use them to get Amazon gift cards (among other things). I've been using all my free amazon money to buy sewing and crafty books. =) Check them out!
Tuesday, September 01, 2009
Pictures from the Dustbowl
Wow, I had so much fun at the Dustbowl Arts Market! The organizers did such a good job with the whole show, the weather was perfect, and there were lots of people out and about! The whole experience was such a great learning experience for me, and I'm so glad I took the risk to try it. I got to meet lots of other talented artists, and it was so much fun to interact with everyone who came by and it felt so good to see that some of them even loved my stuff!
I had lots of fun getting my booth together. Here it is from the front. Overall I was able to pull it together very inexpensively. I borrowed my tent from my in-laws, I bought one green sheet ($7) for a table cloth and borrowed the rest from Mom. My banners were made from the printable letters at Allsorts blog. The pink crates came from wal-Mart on sale, $2.50 each. My quilt racks were an awesome garage sale find--$0.50 each!
Mom and Katie came to hang out with me for the day...when they arrived we hung Emily's quilt up on the right side of the booth. It looked so lovely and just completed my booth!
I was really disappointed that none of my baby quilts sold, but I think that it wasn't the right market for higher pricier items. I had lots of compliments, but no serious buyers for the quilts.
Yum yum. Homemade chocolate chip cookies. Please take one!
A platter full of designer burp clothes!
I hung a line of twine from the tent poles to hang a few of baby bibs and appliqued onsies on. The rest were just placed on the table below. I put my chenille backed blankets in the pink crates.
I still have a good selection of blankets, quilts, bibs and burp clothes left. Keep an eye on my etsy shop. In the next few weeks I'll be listing lots of baby gift sets!
Blessings,
Jessica