Saturday, June 19, 2010

Yo-Yo Hair Clips


When we were at Oklahoma Quiltworks on Thursday, I bought two sizes of Clover Yo-Yo Makers. It didn't take long for my 14-year-old daughter, Ellen, to figure out how to use this nifty gadget, and today she made five fabric yo-yo's. She sewed a vintage button to each yo-yo and then mounted them to ribbon-covered metal hair clips.


All five clips are pictured here in Emily's hair. Aren't they pretty?! Ellen did such a great job making these hair clips! I think she should make some for sale. Anybody interested? :-)


I've made yo-yo's like these many years ago when there was no such a thing as a yo-yo maker. Let me tell you, yo-yo's are sooooo easy to make with this fantastic tool. After seeing Ellen's yo-yo's, I may just make a few myself....


Friday, June 18, 2010

Bloggy Meet Up

Something wonderful happened yesterday; my daughter, Ellen, and I got to meet Lori from Girls in the Garden and her two 15 year old daughters! We met at Oklahoma Quiltworks in the city and Lori and I talked and talked and talked. Then we went for lunch and talked some more. I'm afraid we didn't give the girls much chance to talk because Lori and I just didn't stop. It was so fun! Afterwards, I realized that our conversation was not very sewing related---and I had so many sewing/fabric questions I wanted to ask Lori!

If you've ever listened to Lori's Sew Forth Now podcast, you know how informative and interesting it is. I think I've listened to every episode Lori has made, and I am eagerly awaiting the next. Hint, hint, Lori! Well, I guess I'll give you time to get home from your trip before expecting another podcast. :-) It sure was nice to meet you and your girls; thank you for taking the time to meet up!


Tuesday, June 15, 2010

Green Bean Mountain


Mark loves to garden! And I'm thankful for the harvest. :)

Sunday, June 13, 2010

Skirts, Skirts, Skirts

I'm on a skirt kick right now. Skirts are fun to sew, easy to fit, and comfortable to wear. They can be dressed up or down. I love to wear skirts, especially in the summer, and so I decided to sew a few for myself. Both these skirts are made from the same pattern, and yes, it's from Ottobre.

Pattern: Ottobre 05/07 Design #4
This easy to sew lined skirt has a curved, fitted waistband and closes with an invisible zipper down the center back seam. The magazine gives three variations of this same pattern. I like that it only takes one yard of 60" wide fabric.

Skirt #1: I made this blue floral skirt first.


Fabric used: I used a stretch cotton that I discovered does not really have enough drape for this pattern. The skirt tends to stand out from my body, but hopefully after I wash it a few times it will hang better. One way to fix this problem would be to take out some of the flare from the pattern, but I don't feel like taking it apart to do so. So, I'll leave it alone as is. The skirt is lined with lining fabric from my stash.


Changes and Construction details: I like my skirts to fit about 1" below my natural waist. I think this pattern must run big because I had to take bigger seam allowances to make it fit right. I should have compared my low-waist measurement to the pattern pieces instead of just going by the pattern measurement chart.

I interfaced both the waistband and the waistband facing to give the waist extra body and to prevent the waistline seam from stretching out.

Oh, I just love my Pfaff invisible zipper foot. For years I sewed invisible zippers with a generic plastic foot, but let me tell you, the "real" foot works 100% better.

Skirt #2: What do you think? Is this next skirt too little-girl or too "homeschool mom" for me? My 2 older daughters at home seem to think so. I kind of like it, though. Casual for summer and hey, just about any color top matches.

Fabric: The fabric is a lightweight denim with appliqued flowers. I bought this fabric at Hancock's because it was marked down at a good price. This fabric is not something I normally would choose for myself, but I found that I love this skirt in this fabric.

Changes and Construction details: I took off some of the fullness/flare of the a-line skirt by taking off two inches at the side seam hem and tapering up to the original waistline. Also, the lightweight denim does not require the wearing of a slip, so I did not line the skirt. The waistband is faced with a red floral print. I stabilized the waistband seam with twill tape to prevent stretching.


Conclusion: I love this pattern, I love both skirts, and who knows, I may make another one...or two....

Coming soon: With the remaining fabric, I made this sweet skirt for Emily using a delightful pattern from Sew Blessed Designs. I'll tell you about it next time.

Happy Sewing,


Wednesday, June 02, 2010

How to make a twirly toddler skirt!

Earlier this Spring, my local quilt store, The Patchwork Place moved and had a grand opening sale.  I picked up two small pieces off of the bargain table not knowing what I'd do with them...they were just cute and sort of coordinated!  Do you ever buy fabric like that?  If you love it and it's cheap, I say, go for it!!

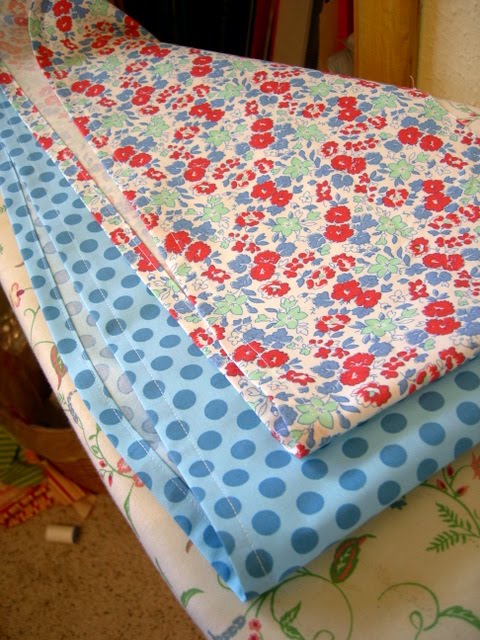
It turns out, the pieces I bought worked well for a little layered skirt for Marie...they were approximately 9 and 10.5  inches long each when I bought them.  Because the one was a bit longer then the other, I able to layer the two pieces, and put in a simple elastic waistband to construct the skirt.  Pretty simple actually, but I thought a photo tutorial might be fun, so here we go.

My fabric pieces were 9 and 10.5 inches tall.  This was perfect for a size 24 mo. skirt for my daughter.  You would need to use taller pieces for taller girls.  I ended up using the full width (44inches) of the fabric for the width of the skirt.  In my opinion, this ended up being a bit too full and for Marie's waist.  I had trouble gathering the bulk tight enough to fit her.  For bigger girls, I think the full fabric width would be great, but for smaller sizes, I'd cut it down some in the future. 

In the first picture above, I sewed up the side seams and put in the 1/2 inch hems for both pieces.  The top layer (the floral print) is 1.5 inches shorter then the bottom piece. 

Next I layered the blue polka dot piece (the longer, "bottom" piece) on top of the floral piece (the shorter "top" piece) with both pieces facing right sides up and sewed along the top edge about 1/2 inch from the edge.  This feels "wrong" because I want the finished skirt to have the floral print on top with the blue dot peeking out along the bottom, but when you finish sewing the seam and turn it to the inside, you will have a finished edge along the top waistline and the two skirt layers to be facing out right (see below).

It's hard to see in this photo (above), but after I turned the blue polka dot piece to the inside, I sewed a casing for the elastic waistband.  If I'm using 3/8 inch elastic, I sew about 5/8 inch down from the top edge, leaving a 1 inch opening to insert the elastic.  

Insert elastic and sew up the opening and you'll have a little twirly skirt!!


Here's the finished skirt on Marie....she's my little sweetheart!

enjoy!
Jessica

Sunday, May 30, 2010

Not a Sewing Wonder

One question I am frequently asked is, "Where do you find the time to sew?” I’m afraid I don’t really have the answer, because lately I have not had time to sew. You’ll notice that my last post was dated May 7th---dear readers, it’s been 3 weeks since I’ve sewn!


I am always amazed, embarrassed, encouraged, and slightly amused (what a mixture of emotions) at the reaction I get from people who read this blog---and believe me, this is not one of the popular, high-profile sewing blogs (nor do I wish it to be). I am often asked in a voice of awe and wonder where I find the time to sew, to homeschool, to play my oboe, to clean my house, to do the laundry, and so forth.


People, I do not spend all my time in the sewing room. :) My house is usually messy, and I’m doing well if I get to the mountains of laundry at least once a week (I refuse to do laundry on a daily basis but have one day set aside as “laundry day”). As for my oboe playing, at my best I am just a mediocre oboist—no illusions of grandeur there. (But hey, if anybody wants to buy me a Loree oboe, I won’t refuse such a gift!)


I do love to sew, and I do wish I had more time for sewing. But such is life, and I’m not complaining. One of these days I hope to graduate from sewing children’s clothing to sewing more for myself. Yes, I occasionally attempt to sew for me, and I’ve even posted a few of the garments I’ve made myself. But truth be told, I rarely wear what I sew for myself. I don’t know enough about fitting and alterations to make a garment fit me right; and I don’t take the time to learn. See…really, I am not a sewing wonder.


Change of topic---remember the quilt top I made over a month ago? Yesterday, instead of cleaning house, I took the time to finish the quilt. I’m so excited about this quilt---it’s for me, a lap quilt, for when I want to settle in on the couch with a good book or movie (and coffee!). The size is 42” by 60” and just the perfect size to snuggle with.


Thanks for reading, and thanks to those who regularly comment. You are all so encouraging.


Quilt Front


Quilt Back


My Buffet Oboe

Friday, May 07, 2010

Ooga Booga and Bananas


What does Ooga Booga have to do with bananas? Nothing really. For that matter, the only thing in this post having to do with bananas is the color of the twill fabric I used for Emily's capri pants. I don't even like bananas unless they're baked in banana bread, but that's beside the point.

So what is the point of this post? I sewed! Yep, I sewed and it sure felt nice!

This yellow "ooga booga'' fabric has been in my stash for several years and wouldn't you know, I had the perfect color of rib knit to use for the binding. The top is from the Summer 3/2008 issue of Ottobre, design #12, the 'Strawberry Tunic." (These details are for you fellow-Otto fanatics).

I made this pattern for Emily
2 years ago; I liked it then, and I like it now. This particular pattern runs big, and so I again made a size 98 when I am now sewing a size 110 or 116 for Emily. I did make the neckline bigger to fit over Emily's head. The only other change I made was to insert a strip of ribbing into the front yoke seam.

The pants are from the Summer 3/2009 issue of Ottobre, design #23, the "Bert Bermudas." Last summer I made
these shorts in denim for my son. This year I made the same pattern, same size, in BANANA twill for Emily. :) I used my sewing machine to free-style embroidery an Ooga Booga on one of the back pockets.


Hopefully this will be the start of summer sewing for Emily. I know these yellow pants will not stay clean for long, so this outfit will be one of her 'nice outfits.' I plan on sewing 2-3 pairs of denim shorts for everyday play. I'm not one to do assembly line sewing, but I think I just might use the same pattern and sew several pairs of identical Bermuda shorts. Stay tuned....