
The hem on the satin and lining is finally completed. We used a completely new (to me) technique--after the zipper was put in (by my wonderful mother!) we left a large area open in the center back lining seam. I pulled the raw edges of lining and satin hems though this hole and sewed the hem by stiching the lining and satin right sides together. Then I sewed the horsehair braid to the satin side of the hem's seam allowance. When it was all pushed back through the hole in the lining, walah! we had a completely finished hem at the perfect length....I wish! Unfortunately it was a bit too long so I had to take out the horsehair braid I'd already sewn in and redo the front hem, raising it about 3/4 inch and tapering that into the sides of the train. Mom said that it served me right... I should have basted then tried it on first before sewing it. She always says that...and I hate basting!
- To do still:
- Re-serge hem on organza to proper length.
- Apply lace border to hem of organza --I'm thinking about doing this by machine because the lace is fairly sturdy and it'll take forever to do by hand.
- Cut lace motifs apart and sew them scattered around the skirt area.
- Sew snaps on the ribbon bra carriers in the shoulder area.
- Final pressing.
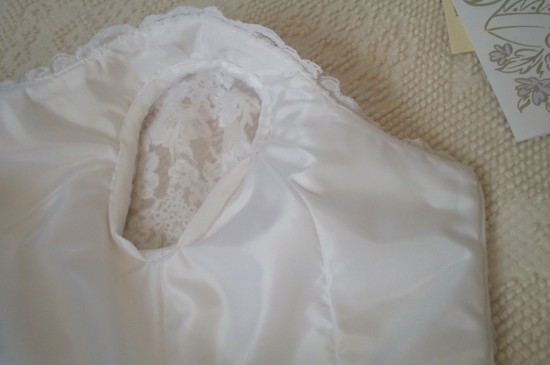
This is a picture of the armhole seam binding. I've never done this technique before--normally I just serge the armhole seam, but a wedding dress deserves better. Because of all the layers in the bodice, it works best to do a bias binding. I made it from my lining fabric, cut an 18 by 2 inch strip on the bias, folded it lengthwise and pressed. I applied it by hand, first to the bodice side and then to the sleeve side of the armhole. I trimmed and clipped my seam because it was pretty bulky. After that was done, I turned the bias-bound seam toward the bodice so that it wouldn't show through the sheer sleeve. I tacked it down at both the underarm and shoulder seams to hold it in place. I didn't tack it down all the way around because it seemed like it didn't want to lay flat on the sides and I didn't want there to be any pulling or stress in that area.
This is the finished sleeve in the dress. The sleeve is the only thing about this dress that didn't turn out exactly like I'd imagined. I'm not even sure how I could have created the exact look I wanted, because I didn't have a pattern or even a picture. Regardless, this sleeve is still pretty and I'm happy with it.
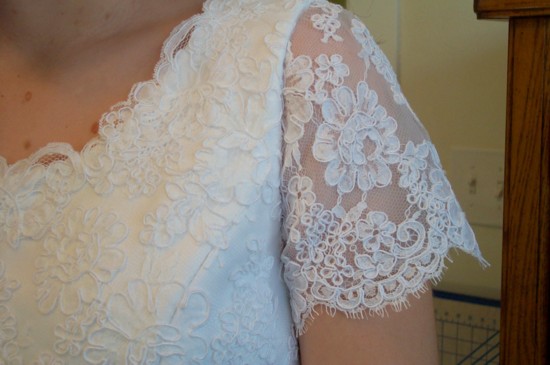
Here you can see the lace trim I applied around the entire neckline. It blends in perfectly, and softens the neckline, making it look more feminine and pretty!
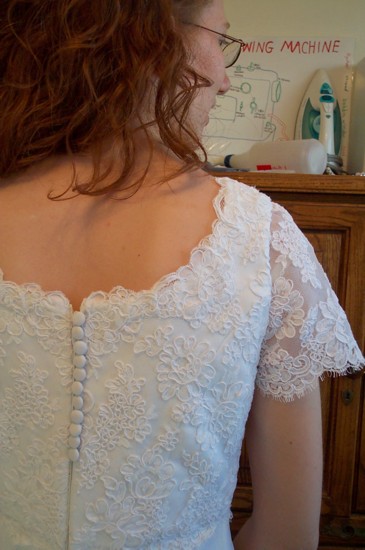
I really love the curve of the back neckline. I like the back of the dress almost better than the front. I am definitely planning on doing my hair up.
 The buttons are all sewn on now....there are 40 total!
That's all for now,
Jessica
Your dress is looking beautiful! I love the lace edging - it really does soften things nicely. Bet you're glad to be done with the buttons! I remember covering what seemed like a million of them with my dress, but the end result was so pretty that it was worth it. Can't wait to see the finished dress!
ReplyDeleteHello Jessica!!
ReplyDeleteYour dress is beautiful and you will look wonderful in it! I miss seeing you and Katie every week!!
I can't wait to see you!
Rachel Nilson