Showing posts with label Crochet Edging. Show all posts

Tuesday, February 19, 2013

Knitting for Babies


The baby shower was last night, so I can now share what I've been working on.  Two grandsons are coming and I'm sooooo excited.  The first baby is due in a few weeks, and the second is due a month later.  (I love having married daughters!  And I love, love, love grandbabies!)  As you may imagine, I have been knitting up a storm.  A few more projects are still secretly being kept under wraps until after the next baby shower, but I can show you these:

 EviePants All In One Booties 
A fantastic pattern knit without seams and starting at the sole. 
 
Another great pattern.  Thanks to this pattern, I now feel comfortable with wrap & turn short rows.
 
Rather monotonous to knit, but I like the finished blanket.  I do wish I had made this one slightly bigger. 


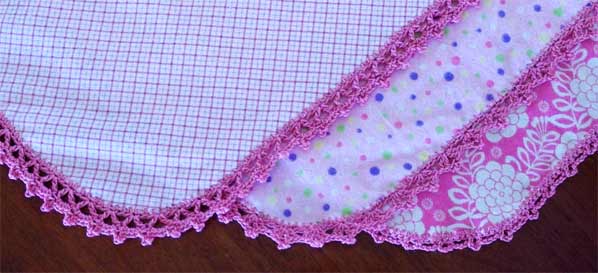
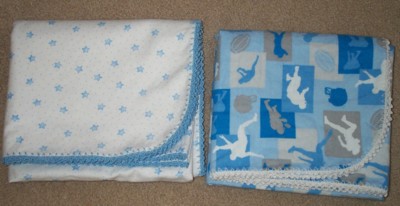
Oh, and I can't forget the flannel receiving blankets with crocheted edging.  One can never have enough of these blankets.
 
Puppies: Only one round, (2 sc in next stitch, chain 1) repeat around.

 
Bicycles:  2 sc, ch 2, around

Wednesday, November 07, 2012

More Crocheted Edgings and a Giveaway

With two new grandbabies due in the spring, I have been busy crocheting edgings on flannel receiving blankets.  A number of years ago I posted how I make these blankets, and today I am going to show you some of the stitches I used on these recent blankets.  Also, at the end of this post you will read about a giveaway for one Sharp Crochet Hook and instruction booklet from Jessica of sharpcrochethook.com.

These edgings are all quick and simple to crochet with only one or two rounds.  If you want more elaborate, fancier edgings, then you may want to look elsewhere; however, if you want edgings that stitch up quickly and easily, then give these a try. 

For this giraffe-monkey fabric, I wanted a plain edging that wasn't very frilly, suitable for a boy.  The thread I used is size 5, and is thicker than the size 10 I typically use.  I like this thread for the heavier look I achieved here.  The stitch is so easy (only one round!) and yet looks great.

Directions:
Only one round: (2 sc directly into fabric, chain 1); repeat around every 1/4-inch


I used the same size 5 yarn for this green polka-dot blanket and crocheted another simple 2 round edging as follows:

Directions:
Rnd 1: sc around, approximately every 1/4-inch
Rnd 2: (chain 2, sc into next st); repeat


The edging for the pastel dot blanket was also stitched in only one round to create a simple, bumpy, picot edging.

Directions:
Only one round: sc into fabric, (chain 3, slip-stitch into the sc (picot made), sc into same hole as first sc, chain 1, sc into next place in fabric, approx. 1/4-inch apart); repeat around.

 
The pink rosebud fabric has long been a favorite of mine.  It's a classic print that is simply sweet.  For this blanket, I used #10 crochet thread in a variegated pink with the following simple scallop stitch:

Directions:
Rnd 1: sc around approximately every 1/4-inch
Rnd 2: (sc in next stitch, 5 dc in next stitch, sc in next stitch); repeat.

~~~
Now for the giveaway information!  Jessica at Sharp Crochet Hook is going to send one Sew Chic reader a free booklet of patterns and one crochet hook like the set pictured below.  The instruction booklet is small in size, but it comes packed with patterns for 18 projects.  I haven't yet tried out the patterns, but I did use the crochet hook to work the pastel dot blanket. I found the sharp hook helped me move along more quickly than with my regular size 8 hook.  Jessica's current hook is improved over her previous design and does not snag or catch on the fabric.  I like this hook even more than the hook I received last year. 


To enter the giveaway, leave a comment on this post.  I will randomly choose a winner in a week or so.  In the meantime, go here to check out some of the exciting patterns included in the booklet.  

Ruth

Wednesday, October 03, 2012

{ Babies }

I think I've been making these baby blankets for hundreds of years, and yet I don't get tired of them.  New moms always seem to appreciate them, too.  

This particular set of a receiving blanket and matching burp cloth was made for a reader's new granddaughter.  The tiny rosebud fabric is such a classic print, and I just love working with it.

Crocheting the edging is not difficult.  Tutorials abound on the internet including mine here from 2007.  

The stitch I used for this edging is as follows:

Rnd 1:  Single crochet round blanket. Slip stitch to connect the last stitch to the first stitch.
Rnd 2:  *Single crochet in next stitch.  5 double crochet in next stitch.  Single crochet in next stitch.*  Repeat around the edge of the blanket. Join and tie off.


The pea green baby set is also finished!  I just love the little booties...so fun to knit.  

The patterns:
Sweater: Paxton Jacket
Booties: Seamless Top-Down Booties
Hat:  Easy Peasy Hat


Saturday, October 15, 2011

Congratulations, Sandy!

The winner of the Sharp Crochet Hook is Sandy, who wrote:  

"I have lots of baby blankets to make (I know 5 or 6 pregnant ladies!) so I would definitely make some flannel blankets with crocheted edgings like you did! Thank you for the giveaway :)"

Congratulations, Sandy!  Email your mailing address to me, and Jessica of Sharp Crochet Hook will send you a hook.  Thank you to all who commented, and thank you, Jessica, for your generosity.

If you did not win the hook, you can buy one from sharpcrochethook.com.  By the way, the hook includes directions for three edging patterns like these pictured below.  Beautiful!

Saturday, October 01, 2011

Crochet-Edged Blanket and Hook Giveaway

Sharp Crochet Hook Review

Over 4 years ago I posted this tutorial on how I make crochet-edged baby blankets.  Sarah left a comment on that post, writing, "Thanks for this! How do you poke your crochet hook through the fabric? Mine is just too dull to get the job done. Is there a special sharp hook you can use?"  Up until today, my reply would have been that I just use an ordinary size 8 steel crochet hook and keep wiggling the tip until it goes through the fabric.

Today my reply would be this:  Go to sharpcrochethook.com and order one of the sharp, pointy crochet hooks!


This week I tried out the sharp crochet hook on the pictured baby blanket, and yes, the hook really is pointed and easily poked through my flannel fabric.  I was able to crochet round 1 of the blanket more quickly with this hook than with my normal, blunt tip hook.  Now I did find that I still had to wiggle the hook a bit, but only because I wanted to ensure that the hook went between the fibers of fabric without tearing the fibers.  All in all, I'm pleased with this pointed hook and will definitely use it on all my baby blankets. 

For your chance to win a free sharp crochet hook, leave a comment on this post telling me  what you would make if you owned your very own Sharp Crochet Hook. If I draw your name, Jessica, at sharp crochet hook, will generously send you one!  My sewing and posting has been so sporadic of late, but I'll close this giveaway in a week or so.  In the meantime, go to Jessica's site and watch the video on how simple it is to crochet an edging on your own baby blankets.  

Ruth

Thursday, February 25, 2010

Crochet Edged Baby Blanket


In 2007 I posted a 'tutorial' of how I crochet an edging on flannel to make receiving blankets. Last week I finished a few more blankets. I made up a new stitch for this sweet rosebud blanket, and so I decided to share it with my readers. And when I say "made up" the stitch, that just means that I didn't get it from a book (although I'm sure it's in many crochet books), but that I made it up after a few false starts after deciding to deviate from my usual stitch. I like this stitch because the whole thing is done in only 2 rounds, instead of 3 or 4. The result is a beautiful scalloped edge that is quick and easy.

enjoy,
Ruth


Directions: Round 1: *sc, ch 1* all the way around the blanket, with the stitches as close together or not, as you wish. My sc stitches are approx. 1/4" apart. Round 2: *sc, 3dc, sc* in every other space between the sc stitches.


Saturday, March 15, 2008

Another look....Crochet Edged Baby Blankets

Recently a reader named Betty sent me some pictures of her lovely blankets that she made following my tutorial. I was so tickled! With Betty's permission, I just have to share her pictures with you! Betty used a wing needle to make holes in her fabric edge, and she crocheted into every other hole. With this method you don't have to worry about getting your stitched spaced evenly! I just may try this next time.


Betty wrote:


What I did was serge the edges and then took it to my sewing machine and used a wing needle and a zig-zag stitch with no thread. I had to leave my bobbin inserted but didn't thread the bobbin thread in order to keep my bobbin sensor from going off. I only punched the holes through one layer of flannel and turned the serged area in as I did the crochet, just as you explained on your blog. I lined up the left side of the zig-zag stitch about a quarter of an inch away from the serged area. (The right side of the zig-zag stitch fell just to the edge of the serged area).

The blue one turned out so nice. I only used every other hole and it only took feeling around with the crochet hook to find the holes since these "old" eyes couldn't always see the holes. By doing it this way, your holes are perfectly lined up and the tension was perfect and all the corners lie flat....Hopefully others who don't crochet will try this because it really wasn't that hard to learn. And, of course, YOU and your little blankets were my total inspiration!


Betty, thank you for the kind words, and thank you for sending your pictures. You did a fabulous job, and your blankets came out great!

Since I'm on the subject of these blankets, I'm going to share the stitch pattern I used on another blanket I made this week. This "shell" edging was simple to crochet and was done in only two rounds.

Round 1: Single crochet around. Make sure your single crochets are fairly close together to prevent the fabric from puckering.

Round 2: chain 1, sc in first stitch; *skip next stitch, sc in next stitch, (3 dc, ch 2, 3 dc) in next stitch, sc in next stitch; repeat from *around.

Since I don't count my foundation single crochets, the amount may not work out exactly for a complete pattern repeat. In this case, I simply adjust my stitches when I get about 8 inches from the end of the blanket. With the rosebud blanket I ignored the "skip next stitch" two times, and my pattern worked out just fine.


Okay, that's enough of these blankets. :-)

happy crocheting!
Ruth


Thursday, February 14, 2008

Gifts for Babies


Crocheted-edged Receiving Blankets
(A tutorial is here)


Bibs and Burp Cloths


More Bibs for Etsy


Not-a-Baby-Anymore who Fell Asleep while Reading


posted by Ruth

Monday, July 23, 2007

Crocheted-Edge Blanket Tutorial


( Edit: Click here to see more of finished blankets and more edging variations. )

Because I've had a number of people ask me how I make the baby blankets with the crocheted edging, I decided to post a tutorial-of-sorts here. I am not going to show how to crochet, but will tell how I make my blankets. If you don't know a few basic crochet techniques, you can learn from a library book, other book, or online.

Supplies:
1 yard of flannel
size 10 crochet thread (available at craft stores or Wal-mart)
size 8 steel crochet hook
optional: serger

Instructions:
  • Start by squaring off the yard of fabric into a 36" x 36" piece.

  • Fold the fabric so that all four corners are together, one on top of another.

  • Use a small plate as a template to draw rounded corners. Cut along the traced line through all four layers. (I used my rotary cutter to cut directly through all 4 layers of the fabric).


  • You may stitch a narrow hem, or just serge around the fabric like I did.


  • Poke the crochet hook through the edge of the fabric and begin crocheting a single-crochet stitch around the blanket. If you serged the edge, narrowly turn it to the back one time as you crochet, encasing the serged edge. If you stitched a narrow hem around the blanket, just encase that hem as you crochet.

  • Continue crocheting around, using any edging pattern you desire. For most of my blankets, I use a simple 2-round, picot stitch edging, as follows:

  • Round 1: single-crochet, chain 2, single-crochet, chain 2. Repeat until you are all the way around the blanket.

  • Round 2: Slip stitch into the beginning single-crochet. Chain 4, slip stitch into the same single-crochet (picot formed). Slip stitch two times into the chain-2 loop. Slip stitch into the next single-crochet. Make picot. Repeat all the way around. Fasten off.


Round 1: single-crochet, chain 2


Round 2: picot stitch
You don't see the serging because it was turned to the back as I crocheted along.


That's it! If you make any of these blankets, I'd love to see pictures!

blessings,
Ruth


p.s. I like to make a matching burp cloth with the scrap piece of flannel that I cut off when squaring up the blanket. I listed this finished set in my Etsy store.


Saturday, July 07, 2007

Another Crochet-Edged Blanket


This time I made a matching burp cloth to coordinate with the receiving blanket. I actually bought this fabric when I was expecting Emily, but it never got finished for her use. I love the colors and the polka dots!

Ruth


Thursday, July 06, 2006

Books, Babies, and Blankets


I just love vintage craft books! My grandmother taught me how to crochet when I was a young girl, and I remember the crochet books and magazines that she had. For that reason, when I came upon a number of old crochet books many years ago at a thrift store, I bought them. It's always a pleasure to me to see my craft books on the shelf, and sometimes I just sit and browse through the pictures, dreaming of the projects I will never find time to do.

When a new baby boy was born to some friends of ours I decided to make him a receiving blanket similar to the blankets I posted about earlier but with a fancier crocheted edging than I typically do. I started an edging from this lovely old book, but after crocheting about 12 inches I took it out, deciding that it was too frilly for a little boy. After a few minutes of trial and error, I ended up creating a simpler
edging that is more fitting for the fabric. Three Waltons' episodes later, the blanket was finished and is now ready to give to the precious new baby.

Ruth


Wednesday, February 08, 2006

Crocheted Edged Baby Blankets

I should have started counting years ago when I first started making these baby blankets. It had to have been at least 18 years ago when I crocheted around that first square of flannel, and it has to be at least 100 blankets that I have made since. I know that I finished 15 of them during the 9 months I was pregnant with Emily preceding her birth in April 2006.

Hmm...I should have kept a log. Every year I tell myself that I am going to keep a sewing journal to record all my sewing projects. The closest I have gotten to that goal was the two years I wrote everything down on a calendar, complete with fabric swatches. Last year I started a list so that I could transfer the information to a scrapbook. The listed ended three months later, but the projects continued. Needless to say, the scrapbook was never made. This blog will have to suffice for now.

Today I finished crocheting around the last of the 2 blankets that a friend requested me to make. You've heard of double weddings, but this friend of mine is going to a double baby shower. Both ladies are having boys, and these blankets will be for their babies. I hope they will enjoy the blankets.

Ruth