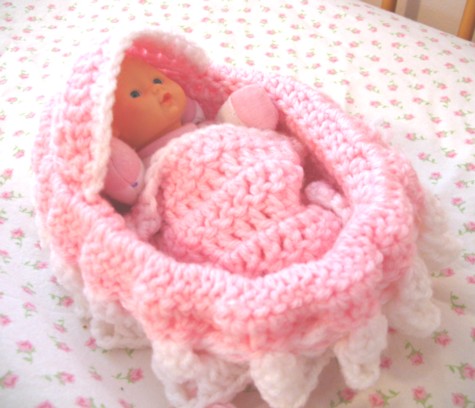
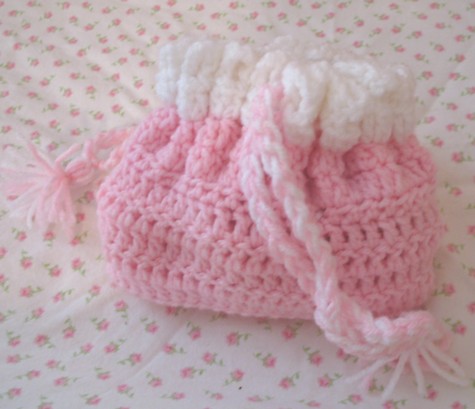
Showing posts with label Crocheting. Show all posts
Thursday, March 27, 2014
Crocheted Flower Garland
One cold and blustery day last month, I walked into Walmart and spied the bright and cheery cotton yarn on the bottom shelf in the yarn department. I bought multiple colors, not really sure what I would make, but I knew I had to make something, anything, to help chase away the winter blues. Thanks to Ravelry, I found the perfect patterns for a daisy garland and daisy coasters. Well, we are starting to get a few warm days now and again, but the winter cold still seems to be languishing around. My colorful garland is hanging over the fireplace mantle ready to welcome the spring while the heat from the fire keeps me warm. I am so ready for summer.
Thursday, February 13, 2014
Sweetheart Granny Squares
Not exactly square, but in the tradition of crocheted granny squares, these granny hearts are made with brightly colored yarn left over from other projects. I found the pattern at a new-to-me blog, Yarn Pumpkin. (Thank you, Yarn Pumpkin, for sharing your pattern!)
I crocheted the hearts using a size J hook (6 mm) and assorted cotton yarns. My finished hearts are approx. 7.25 inches wide and 7.5 inches high. The hearts are super easy to crochet, and I made all five in an evening while watching the Olympics.
My daughters told me the hearts are too pretty to use as dishcloths and that they would use theirs as a coaster or doily.
Wednesday, November 07, 2012
More Crocheted Edgings and a Giveaway
With two new grandbabies due in the spring, I have been busy crocheting edgings on flannel receiving blankets. A number of years ago I posted how I make these blankets, and today I am going to show you some of the stitches I used on these recent blankets. Also, at the end of this post you will read about a giveaway for one Sharp Crochet Hook and instruction booklet from Jessica of sharpcrochethook.com.
These edgings are all quick and simple to crochet with only one or two rounds. If you want more elaborate, fancier edgings, then you may want to look elsewhere; however, if you want edgings that stitch up quickly and easily, then give these a try.
Directions:
Only one round: (2 sc directly into fabric, chain 1); repeat around every 1/4-inch
Directions:
Rnd 1: sc around, approximately every 1/4-inch
Rnd 2: (chain 2, sc into next st); repeat
The edging for the pastel dot blanket was also stitched in only one round to create a simple, bumpy, picot edging.
Directions:
Only one round: sc into fabric, (chain 3, slip-stitch into the sc (picot made), sc into same hole as first sc, chain 1, sc into next place in fabric, approx. 1/4-inch apart); repeat around.
The pink rosebud fabric has long been a favorite of mine. It's a classic print that is simply sweet. For this blanket, I used #10 crochet thread in a variegated pink with the following simple scallop stitch:
Directions:
Rnd 1: sc around approximately every 1/4-inch
Rnd 2: (sc in next stitch, 5 dc in next stitch, sc in next stitch); repeat.
To enter the giveaway, leave a comment on this post. I will randomly choose a winner in a week or so. In the meantime, go here to check out some of the exciting patterns included in the booklet.
Ruth
These edgings are all quick and simple to crochet with only one or two rounds. If you want more elaborate, fancier edgings, then you may want to look elsewhere; however, if you want edgings that stitch up quickly and easily, then give these a try.
For this giraffe-monkey fabric, I wanted a plain edging that wasn't very frilly, suitable for a boy. The thread I used is size 5, and is thicker than the size 10 I typically use. I like this thread for the heavier look I achieved here. The stitch is so easy (only one round!) and yet looks great.
Only one round: (2 sc directly into fabric, chain 1); repeat around every 1/4-inch
I used the same size 5 yarn for this green polka-dot blanket and crocheted another simple 2 round edging as follows:
Rnd 1: sc around, approximately every 1/4-inch
Rnd 2: (chain 2, sc into next st); repeat
The edging for the pastel dot blanket was also stitched in only one round to create a simple, bumpy, picot edging.
Directions:
Only one round: sc into fabric, (chain 3, slip-stitch into the sc (picot made), sc into same hole as first sc, chain 1, sc into next place in fabric, approx. 1/4-inch apart); repeat around.
The pink rosebud fabric has long been a favorite of mine. It's a classic print that is simply sweet. For this blanket, I used #10 crochet thread in a variegated pink with the following simple scallop stitch:
Directions:
Rnd 1: sc around approximately every 1/4-inch
Rnd 2: (sc in next stitch, 5 dc in next stitch, sc in next stitch); repeat.
~~~
Now for the giveaway information! Jessica at Sharp Crochet Hook is going to send one Sew Chic reader a free booklet of patterns and one crochet hook like the set pictured below. The instruction booklet is small in size, but it comes packed with patterns for 18 projects. I haven't yet tried out the patterns, but I did use the crochet hook to work the pastel dot blanket. I found the sharp hook helped me move along more quickly than with my regular size 8 hook. Jessica's current hook is improved over her previous design and does not snag or catch on the fabric. I like this hook even more than the hook I received last year. To enter the giveaway, leave a comment on this post. I will randomly choose a winner in a week or so. In the meantime, go here to check out some of the exciting patterns included in the booklet.
Ruth
Wednesday, October 03, 2012
{ Babies }
I think I've been making these baby blankets for hundreds of years, and yet I don't get tired of them. New moms always seem to appreciate them, too.
This particular set of a receiving blanket and matching burp cloth was made for a reader's new granddaughter. The tiny rosebud fabric is such a classic print, and I just love working with it.
Crocheting the edging is not difficult. Tutorials abound on the internet including mine here from 2007.
The stitch I used for this edging is as follows:
Rnd 1: Single crochet round blanket. Slip stitch to connect the last stitch to the first stitch.
Rnd 2: *Single crochet in next stitch. 5 double crochet in next stitch. Single crochet in next stitch.* Repeat around the edge of the blanket. Join and tie off.
The pea green baby set is also finished! I just love the little booties...so fun to knit.
The patterns:
Sweater: Paxton Jacket
Booties: Seamless Top-Down Booties
Hat: Easy Peasy Hat
Saturday, October 01, 2011
Crochet-Edged Blanket and Hook Giveaway
Sharp Crochet Hook Review
Over 4 years ago I posted this tutorial on how I make crochet-edged baby blankets. Sarah left a comment on that post, writing, "Thanks for this! How do you poke your crochet hook through the fabric?
Mine is just too dull to get the job done. Is there a special sharp
hook you can use?" Up until today, my reply would have been that I just use an ordinary size 8 steel crochet hook and keep wiggling the tip until it goes through the fabric.
Today my reply would be this: Go to sharpcrochethook.com and order one of the sharp, pointy crochet hooks!
This week I tried out
the sharp crochet hook on the pictured baby blanket, and yes, the hook
really is pointed and easily poked through my flannel fabric. I was
able to crochet round 1 of the blanket more quickly with this hook than
with my normal, blunt tip hook. Now I did find that I still had to
wiggle the hook a bit, but only because I wanted to ensure that the hook
went between the fibers of fabric without tearing the fibers.
All in all, I'm pleased with this pointed hook and will definitely use
it on all my baby blankets.
Ruth
Thursday, February 25, 2010
Crochet Edged Baby Blanket

In 2007 I posted a 'tutorial' of how I crochet an edging on flannel to make receiving blankets. Last week I finished a few more blankets. I made up a new stitch for this sweet rosebud blanket, and so I decided to share it with my readers. And when I say "made up" the stitch, that just means that I didn't get it from a book (although I'm sure it's in many crochet books), but that I made it up after a few false starts after deciding to deviate from my usual stitch. I like this stitch because the whole thing is done in only 2 rounds, instead of 3 or 4. The result is a beautiful scalloped edge that is quick and easy.
enjoy,
Ruth
Directions: Round 1: *sc, ch 1* all the way around the blanket, with the stitches as close together or not, as you wish. My sc stitches are approx. 1/4" apart. Round 2: *sc, 3dc, sc* in every other space between the sc stitches.


Friday, January 02, 2009
First Project of 2009

It wasn't a sewing project, but my first project in 2009 nevertheless. I started these booties in December, hoping to finish them for a Christmas gift for Jaidyn, but I didn't complete them until yesterday. So, Jessica--consider these a late Christmas gift. :) I have also started a second identical pair which I plan to list on Etsy along with the light pink bunting pictured below.
This bunting I made Jaidyn is from a discontinuted Kwik Sew pattern. I made two, and Jessica chose the dark pink one. As you can see in the photo, the bunting is too big on Jaidyn. The pattern is sized for newborn to 3 month old babies, and there is a lot of growing room.
Isn't Jaidyn Marie the sweetest baby you've ever seen?!! Ooh, the grandma in me is coming out. I tell you, though, it is ever so nice to have a little baby to sew for again!
Ruth


Thursday, April 24, 2008
Birthday gifts for Special Little People
A crayon roll and coloring books for little Miss Emily...


Hugs,
Jessica

Tuesday, April 15, 2008
I've been in the sewing mode....
Yesterday I finished off a couple of mini quilts I started last summer. I was trying to use up some pretty little scraps, and these just sort of evolved. If they don't sell, (they're in my etsy shop right now) I plan to hang the rose one in my sewing room, and the little chick one in Elliot's room.


Some time ago I bought a bunch of flannel at Joann's on a $2 per yard sale. I've been intending to start making crochet-edged blankets like Mom does for gifts and to sell. Today I finally got the 6 blankets cut out and serged. It didn't take any time and now they are ready to start crocheting on!
Blessings,
Jessica

Saturday, March 15, 2008
Another look....Crochet Edged Baby Blankets
Recently a reader named Betty sent me some pictures of her lovely blankets that she made following my tutorial. I was so tickled! With Betty's permission, I just have to share her pictures with you! Betty used a wing needle to make holes in her fabric edge, and she crocheted into every other hole. With this method you don't have to worry about getting your stitched spaced evenly! I just may try this next time.


Betty wrote:
What I did was serge the edges and then took it to my sewing machine and used a wing needle and a zig-zag stitch with no thread. I had to leave my bobbin inserted but didn't thread the bobbin thread in order to keep my bobbin sensor from going off. I only punched the holes through one layer of flannel and turned the serged area in as I did the crochet, just as you explained on your blog. I lined up the left side of the zig-zag stitch about a quarter of an inch away from the serged area. (The right side of the zig-zag stitch fell just to the edge of the serged area).
Betty, thank you for the kind words, and thank you for sending your pictures. You did a fabulous job, and your blankets came out great!
Since I'm on the subject of these blankets, I'm going to share the stitch pattern I used on another blanket I made this week. This "shell" edging was simple to crochet and was done in only two rounds.
Round 1: Single crochet around. Make sure your single crochets are fairly close together to prevent the fabric from puckering.
Round 2: chain 1, sc in first stitch; *skip next stitch, sc in next stitch, (3 dc, ch 2, 3 dc) in next stitch, sc in next stitch; repeat from *around.
Since I don't count my foundation single crochets, the amount may not work out exactly for a complete pattern repeat. In this case, I simply adjust my stitches when I get about 8 inches from the end of the blanket. With the rosebud blanket I ignored the "skip next stitch" two times, and my pattern worked out just fine.


Okay, that's enough of these blankets. :-)
happy crocheting!
Ruth

Betty wrote:
What I did was serge the edges and then took it to my sewing machine and used a wing needle and a zig-zag stitch with no thread. I had to leave my bobbin inserted but didn't thread the bobbin thread in order to keep my bobbin sensor from going off. I only punched the holes through one layer of flannel and turned the serged area in as I did the crochet, just as you explained on your blog. I lined up the left side of the zig-zag stitch about a quarter of an inch away from the serged area. (The right side of the zig-zag stitch fell just to the edge of the serged area).
The blue one turned out so nice. I only used every other hole and it only took feeling around with the crochet hook to find the holes since these "old" eyes couldn't always see the holes. By doing it this way, your holes are perfectly lined up and the tension was perfect and all the corners lie flat....Hopefully others who don't crochet will try this because it really wasn't that hard to learn. And, of course, YOU and your little blankets were my total inspiration!
Betty, thank you for the kind words, and thank you for sending your pictures. You did a fabulous job, and your blankets came out great!
Since I'm on the subject of these blankets, I'm going to share the stitch pattern I used on another blanket I made this week. This "shell" edging was simple to crochet and was done in only two rounds.
Round 1: Single crochet around. Make sure your single crochets are fairly close together to prevent the fabric from puckering.
Round 2: chain 1, sc in first stitch; *skip next stitch, sc in next stitch, (3 dc, ch 2, 3 dc) in next stitch, sc in next stitch; repeat from *around.
Since I don't count my foundation single crochets, the amount may not work out exactly for a complete pattern repeat. In this case, I simply adjust my stitches when I get about 8 inches from the end of the blanket. With the rosebud blanket I ignored the "skip next stitch" two times, and my pattern worked out just fine.


Okay, that's enough of these blankets. :-)
happy crocheting!
Ruth
Thursday, February 14, 2008
Gifts for Babies
Monday, July 23, 2007
Crocheted-Edge Blanket Tutorial
Because I've had a number of people ask me how I make the baby blankets with the crocheted edging, I decided to post a tutorial-of-sorts here. I am not going to show how to crochet, but will tell how I make my blankets. If you don't know a few basic crochet techniques, you can learn from a library book, other book, or online.
Supplies:
1 yard of flannel
size 10 crochet thread (available at craft stores or Wal-mart)
size 8 steel crochet hook
optional: serger
Instructions:
- Start by squaring off the yard of fabric into a 36" x 36" piece.
- Fold the fabric so that all four corners are together, one on top of another.
- Use a small plate as a template to draw rounded corners. Cut along the traced line through all four layers. (I used my rotary cutter to cut directly through all 4 layers of the fabric).
- You may stitch a narrow hem, or just serge around the fabric like I did.
- Poke the crochet hook through the edge of the fabric and begin crocheting a single-crochet stitch around the blanket. If you serged the edge, narrowly turn it to the back one time as you crochet, encasing the serged edge. If you stitched a narrow hem around the blanket, just encase that hem as you crochet.
- Continue crocheting around, using any edging pattern you desire. For most of my blankets, I use a simple 2-round, picot stitch edging, as follows:
- Round 1: single-crochet, chain 2, single-crochet, chain 2. Repeat until you are all the way around the blanket.
- Round 2: Slip stitch into the beginning single-crochet. Chain 4, slip stitch into the same single-crochet (picot formed). Slip stitch two times into the chain-2 loop. Slip stitch into the next single-crochet. Make picot. Repeat all the way around. Fasten off.
You don't see the serging because it was turned to the back as I crocheted along.
That's it! If you make any of these blankets, I'd love to see pictures!
blessings,
Ruth
p.s. I like to make a matching burp cloth with the scrap piece of flannel that I cut off when squaring up the blanket. I listed this finished set in my Etsy store.
Saturday, July 07, 2007
Another Crochet-Edged Blanket
Monday, November 06, 2006
Crocheted Cradle Purse

EDIT: The instructions can be found at this link. http://www.oocities.org/crotiques/origcradle.htm
Subscribe to:
Posts (Atom)