Showing posts with label Purses and Bags. Show all posts

Friday, February 01, 2013

Messenger Bag


My bag has been finished now for several weeks, and I've been enjoying it since then.  The pattern is from Lori at Girls in the Garden.  The bag is a nice size--not too big, and not too small.  (An iPad fits in it along with my other usual purse contents).  

The changes I made to the pattern are few:
  • added hardware for an adjustable strap.
  • reinforced the strap with grosgrain ribbon.
  • added a 3rd pocket for my cell phone.
  • added a snap closure to the inside pocket .

Changes I wish I had made:
  • put the extra pocket under the front flap instead of in the back.
  • added batting to the front flap.  (It is interfaced, but the flap is still pretty flimsy).
  • paid better attention to the fabric flower motif.  I don't like how the 2 big blue flowers are adjacent on the front of the bag.

Note:  There are no pattern pieces given for the pattern, just a set of instructions with the dimensions given for each pattern piece.  The layout drawings are clear cut, and the instructions are easy to follow.  The fabric requirements are spot on.  I had practically no leftover fabric, just enough to cut out a third pocket.

Likes:  The design of the bag is what first caught my attention.  I like the long strap that can be worn cross-shoulder, and I like my modification of making an adjustable strap so it can also be worn over one shoulder.  I like that the purse has multiple pockets--one on the inside and two on the outside.  

Dislikes:  The pattern was difficult to read in places, especially where the print was placed on the blue and pink background colors.  


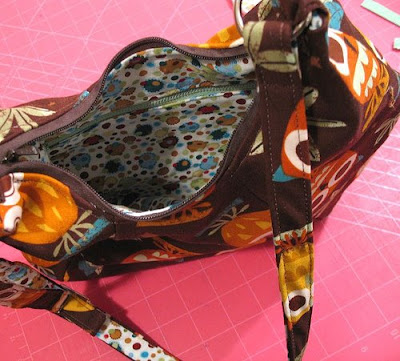
big pocket, another zippered pocket, and my additional small pocket
Gotta love pockets!


snap added to inside pocket 
(My snap press from diaper-making days still comes in handy!)


 The instructions call for interfacing the straps, but I also inserted grosgrain ribbon for additional sturdiness.  If I had had strap webbing on hand, I would have used it instead of the grosgrain.  

Thursday, March 24, 2011

Purses, Bags, & More - Book Review

If you've read this blog for any length of time, you know that I enjoy sewing purses and bags on occasion. So when I was asked to be part of a blog tour introducing Clotilde's new book, Purses, Bags, & More, I was glad to participate.

Purses, Bags, & More is a 48-page book featuring 10 fabulous projects designed by Pearl Louise Krush. I like that all the purses in the book are unique in style and design. The instructions appear to be clearly written, detailed, and easy to understand with helpful illustrations. No actual pattern pieces are given, but dimensions are given for each piece needed to complete each project. I think that beginning and advanced sewers alike would have great success sewing any of these 10 purses.

The "On The Town" bag is a cute patchwork bag, oblong in size, with some neat details including the contrast "flange" strip and the tie closure. I especially like the gathered side panels and the handles that look like they're buttoned on. The instructions for the bag are concisely written with orderly steps to create the patchwork and bag assembly.


Purses, Bags, & More is available here as a hard copy and AND also as a PDF download if you just can't wait to receive your copy in the mail. Follow the blog tour to read more about other projects in this great new book.

Day 1 (Mar 21): Tara of Tinkerfrog
Day 2 (Mar 22): Cindy of Sew Blessed

Day 3 (Mar 23): Stephanie of Unfinished Sewing Projects

Day 4 (Mar 24): Ruth (me!) of SewChic

Day 5 (Mar 25): Julie of From These Hands

Thursday, March 03, 2011

A New Purse and a Pattern Giveaway

NOTE: Comments are now closed for the giveaway.


"Victory Bags" from Indygo Junction by Amy Barickman

Pattern Description:

From the pattern back: A pair of stylish shoulder bags with a 1940s wartime influence. The Victory Bags are constructed with a set-in gusset base and are a sensible size for everyday use. Both styles include instructions for an internal zippered or patch pocket.

Pattern Sizing:
one size: The bags measure approximately 14” wide x 11” high x 3” deep at the base, excluding shoulder strap.

Did it look like the photo/drawing on the pattern envelope once you were done sewing with it?

Yes. I sewed View A with the buttons. View B sports a buckle.

Were the instructions easy to follow?

The instructions were well-written with clear, helpful illustrations. The only thing I found lacking was a pattern layout diagram. Because of the many pieces, a layout diagram would have been helpful.

Error on pattern piece G: pattern piece says to cut 2 from interfacing; only 1 is needed.

The gussets were surprisingly easy to sew. I expected to have to re-do the gussets at least once, but they came together just right and on the first try. Again, great instructions!

What did you particularly like or dislike about the pattern?

I like the style and size of this purse. The gussets at the purse bottom make for a roomy inner compartment. The purse is easy to sew, but yet the details of the design make it interesting. I also like that the purse has a magnetic snap closure under the front flap. The 3 buttons are for just for show. :)

Fabric Used:
Exterior: I used a piece of home decor fabric--a heavy twill, I think--a typical home decorating fabric with a mod leave print on a lime green background.


Interior: A cotton quilting fabric from my stash. The bag also has an inner lining of Pellon fleece. The strap and front flap are also interfaced with fusible interfacing.


Pattern alterations or any design changes you made:

The only change I made was to add a second pocket to the purse interior. The pattern gives great instructions on how to make a zippered pocket; my bag has both the zippered pocket and the added second patch pocket.


Conclusion:
I love, love, love this pattern. It's the perfect size purse, and I can imagine making several in various fabrics...change the fabric and you get a whole new look..cute and trendy, sleek or classic...just imagine the possibilities! I will definitely make this pattern again, but next time in View B.

Ruth


Okay, if you've read this far, here is the information about the pattern giveaway! Sew Chic will be giving away two purse patterns from Indygo Junction, complements of Amy Barickman, owner and founder of Indygo Junction. The two purse patterns are: Victory Bags (reviewed above), and Cross-Over Carryall, another great pattern I hope to sew up soon.

To enter, go to the Indygo Junction site and browse the shop. Then come back here and leave a comment on this post answering the following question: If you were to buy one item from Indygo Junction, what would it be?

Be sure to leave your email address so we have a way to contact you if your name is drawn.

Note, because of shipping costs, this giveaway is open only to people with addresses in the United States and Canada. We're sorry that this is closed to our international readers.

In a week or two, we will choose 2 winners for the 2 patterns. The first winner will receive her choice of the 2 patterns, and the second winner will receive the 2nd pattern.

Now, go to Indygo Junction and have fun browsing all the fabulous patterns! :)
happy sewing,
Ruth and Jessica

Sunday, December 06, 2009

Laraine Shoulder Bag Kit Giveaway

4:22 pm, December 14th, Comments are now closed. A winner has been drawn!

Good morning friends!
Today I'm excited to show off my new Laraine Shoulder Bag designed by the lovely ladies at Marie Madeline Studios, and offer you a chance to win a kit to make this fun bag!

Marie Madeline sent me one of their Laraine Kits to sew up. With the exception of interfacings, the kit included everything I needed to make this bag: black upholstery outer fabric, coordinating lining fabric, buttons, a snap set, and the pattern.

I was really pleased with how well this bag sewed up. The pattern was very well done, the directions and pictures were easy to understand and all the pieces matched up with no issues. (Don't you hate it when you go to all the work to buy fabric and cut a project out and then you spend half of your sewing time re-working the pattern just to get it to go together properly??)

The only thing that wasn't clear to me in the pattern was that the gussets at the end of the bag need to be sewn NOT at 3 1/2 inches down from the bottom corners, but placed so that the length of the gusset seam is 3 1/2 inches long. I didn't realize this until I was finished and trying to figure out why the finished dimensions of my bag were different then the pattern states. The only difference is that the base of my bag is a several inches shorter and wider then intended. Oh, well, I love it anyway. =)


Marie Madeline is offering a kit to one of our readers. I will draw a winner next week on Monday the 14th, and the winner will have a choice of this kit in either black or cranberry red.

Simply leave a comment to enter!

For an additional entry you can become a facebook fan of my etsy shop
HERE or of Marie Madeline, HERE. Leave an extra comment letting me know you are a facebook fan.

For a 3'rd entry you can promote (blog, facebook, or twitter) this giveaway. Leave a 3'rd comment once you've done that!


Good luck and we'll post the winner on Monday!


Blessings,
Jessica

Thursday, April 23, 2009

Butterick 4560 Diaper Bag Pattern Review

I've actually been using this diaper bag for about 5 months now, but I'm just now getting around to posting about it. When I was starting to sew it, I couldn't find many pictures or reviews of this pattern, so I wanted to be sure and share it here for future diaper bag sewers.

Butterick 4560. Overall this pattern was well written and easier to follow then I thought it would be. I went slowly and followed each step. One major issue is that the directions don't have you put on the velcro to close it till the very last step. At that point I had to sew through all layers of the top flap to attach the velcro. It doesn't look too bad, but if you didn't want your stitches showing on the front of the bag, then the velcro should be attached to the flap lining before the flap is sewn onto the bag.

I made a few major changes. I thought the bag looked a bit tall for my tastes, so I cut off two inches from the height. That was a bit of work because I had to take off two inches from almost every pieces including the lining pieces and most of the pockets.

The pattern called for fusible fleece to add body and stabilize the bag. I didn't want the puffiness of fleece, so I used a heavy canvas instead(part of an old mail bag I got from a garage sale, actually). Because I couldn't fuse the canvas like the fusible fleece, I basted it to the wrong side of the outer pieces before I began to construct the bag. I then treated those pieces as one.

I liked the effect the canvas gave it, but next time I wouldn't use quite as thick and heavy of canvas...it was extremely hard to sew through the multiple layers even with my Pfaff machine. I did use the sz. 100 needle and that helped, but it was still tricky, and my seams across the top of the bag aren't as neat as I normally like.

The handle was way too long. I shortened it and I omitted the handle pad as I thought it was unnecessary for this size of bag.

I love all the pockets! They have been great. I did use fusible interfacing to give body to the one outside pocket with the flap. It turned out great. For the base of the bag I actually stitched two layers of peltex to the bottom lining piece, then sewed the lining together and continued as normal. I did also have a layer of my canvas sewn to the outer base piece, so the bottom is pretty stable, yet still flexible.

I've been using this bag for 5 months now and it's held up really well and still looks great. I feel quite stylish having a unique bag and fits my personality and needs. I would recommend this pattern, absolutely!

Blessings,
Jessica

Monday, April 20, 2009

Fat Quarter Purse


When I saw this cute purse pattern at wewilsons.blogspot, I decided that it would be the next purse I sewed. The purse is made from just 2 fat quarters. The purse, however, is smaller than I like, so if Ellen claims this, it's hers (let's see if she reads her mama's blog). Because I do like the style and shape, I may try enlarging the pattern and making another for me. We'll see.

lots of pictures here---including a picture tutorial of how I made the inside zippered pocket:


The instructions did not call for this, but I used an inner layer of canvas to give more body to the bag. I used canvas in the straps as well.


The instructions also did not call for an inside pocket, but I absolutely *need* at least one inside pocket in my purses. For the pocket, I cut two rectangles the same size as well as 2 layers of interfacing which I fused to the wrong side of the pocket pieces.


I used a vintage metal zipper from my stash, but since it was too long I had to use needle-nose pliars to shorten the zipper. It's fairly easy to just grab the metal zipper teeth one at a time and pull them off the zipper tape.


After deciding how long to make my pocket opening, I drew a rectangle on the wrong side of one pocket piece and then proceeded to sew the pocket to the purse lining, right sides together, and sewing on the drawn lines.


Next, I cut a slit through both fabric layers, clipping to the corners, and being careful not to cut through the stitching line.


I didn't take a picture of this step, but I pulled the pocket through to the wrong side of the lining and ironed it down. This takes some work to get the pocket to lie flat, but it is possible.


Here is the front of the lining with the finished opening, ready to sew in the zipper.


Wonder Tape-- this is great stuff! It is sticky on both sides, and you can sew through it without gumming up your machine. You can see where I applied the tape to both long edges of the zipper. Next I peeled the paper backing off and laid the zipper in place underneath the pocket opening.


To finish the pocket, I topstitched close to the edge of the rectangle opening. The wonder tape held the zipper firmly in place with no shifting---gotta love it!

Lastly, on the wrong side of the lining, I placed the second pocket piece against the first pocket piece, right side to wrong side and sewed around the edges. While sewing the 2 pocket pieces together, I had to be careful to hold the lining piece out of the way and sew only the pocket pieces. The pocket ends up with a clean finish on the inside, and the only stitches to be seen are around the zipper opening.


Monday, March 16, 2009

Ottobre Pea Pod Purse, not Linen


One day last week I went up to my sewing room to clean up the scattered remains of the blue Vogue jacket, but instead of cleaning I sewed this handbag. And now the floor of my sewing room is littered with jacket scraps and purse scraps...I'm so messy when it comes to sewing.

The Pattern: From the 2/2009 Ottobre Woman magazine, pictured in the magazine and a free download at the Ottobre website. Shown in green in the magazine, the purse is named Pea Pod Linen Purse. This purse is currently featured on the Ottobre blog, and anybody who makes it by March 30th and sends in a photo will be entered into a drawing for a prize. :-)

The Fabric: I used Stash Fabric, Stash Zippers, Stash batting, and even Stash thread. The outer fabric is leftover from a skirt I made one daughter several years ago, and the pockets and binding are leftover from another skirt I made another daughter. The pink came from nowhere-somewhere-who-knows-where. I barely had enough of any of the three fabrics, and the binding/pocket fabric really does not go with the outer fabric. But both outer and binding/pocket fabric match okay with the pink fabric, so I decided that everything would go together just fine. Follow that?

Likes/Dislikes: I like the style; I like the many pockets; I especially like the elasticated pocket on the outside; I like the zipper closure; I like the large size; I like the vintage metal zipper on the inside pocket; I like just about everything about this bag.

But...

I don't like the inner layer of batting. The pattern calls for fusible batting, but I didn't have any so I used quilt batting. The batting I used is TOO thick in my opinion. In retrospect, I should have used the thick interfacing or canvas that I typically use when I make purses. This purse reminds me of the small-appliance covers I made in the 1980's. Take off the handle and the bottom of the purse, and voila, it could be a toaster cover. :-)

Other Changes I'd make: I constructed the handles as the pattern stated--by interfacing the fabric strips, sewing a tube, turning right side out and stitching along the length. Okay, I've made enough purses over the years that I should have followed my instinct and reinforced the handles more by interfacing them, adding canvas or several more layers of fabric, and generally making the straps more heavy-duty.

The instructions: were good. In fact, I thought the instructions were more detailed and thorough than usual for Ottobre. This could be because the pdf download had more available room for instructions than can fit in a magazine.

Conclusion: I'm going to give this bag a test-run as a purse. But if the "thickness of the batting-problem" irritates me too much, then the bag will become a knitting bag. For that matter, I think this bag would make a wonderful knitting bag--it's a good size without being too big, and all the pockets could hold all kinds of knitting goodness. Hmm...I think I like this bag more and more each passing moment. Thank you, Ottobre!

Ruth


The elastic-topped pockets are featured on both the front and back of the purse.


The inside of my bag---I love the brightness and the pockets.


Pea Pod Linen Purse as shown in the 2/2009 issue of Ottobre Woman

Thursday, June 05, 2008

The Birdie Sling is finished!


This purse pattern went together much quicker than I had anticipated. I finished it today! I posted a review at patternreview.com and have pasted the review here. Now that the bag is finished, I'm not quite sure if I like the fabric. It's kind of bright and wild, don't you think? I may end up using it as a knitting bag....
happy sewing,
Ruth


Pattern Description:

From the pattern: "This honey of a sling holds everything and it's easy to make! (Great for beginners.) Modern styling and dynamic proportions will make this one of your favorite carry-all bags!"

Pattern Sizing:
This bag is big. I don't normally carry big purses, but since I like the design, I reduced the pattern pieces to 86% on my copy machine. The purse is still big---I should have reduced it even more.

Did it look like the photo/drawing on the pattern envelope once you were done sewing with it?
Yes!

Were the instructions easy to follow?
The instructions were easy, but a bit wordy so that it was confusing at times. I found it best to read through the instructions and then just start making the purse in my own order.

What did you particularly like or dislike about the pattern?
In particular, I like the gussets at the bag bottom. Also, I like the design of the handle, but I disliked its length. I would have liked the handles to be longer than they are, and next time I make this pattern I will make them longer.

Fabric Used:
Cotton quilting fabric: to be specific, I used Alexander Henry's Kleo and Bangle Dots fabric.

Pattern Alterations or any design changes you made:
Changes:
1. To make the bag a bit smaller, I reduced the pattern pieces as stated above.
2. I added a metal magnetic closure.
3. I added a zippered pocket in place of the smaller pocket.
Inside of Bag
4. I did not use fleece as an inner lining. Instead I used a heavy canvas. I used the canvas in the handle as well as in the purse body and upper band; I basted the canvas to the lining pieces and treated them as one layer. This makes the bag sturdier on the inside, but still looks soft and drapey (is that a word?) on the outside.

Would you sew it again? Would you recommend it to others?
Yes, I will sew it again. I already have the fabric! Next time I will make the bag even smaller yet; I will lengthen the handle; and I will probably find a lighter weight canvas for the inner lining. Perhaps I'll try the fleece that the pattern recommends.

Conclusion:
I am very pleased with this bag. The colors I chose are brighter than I normally would use in a purse, so I may end up using this for a knitting bag if I feel too self-conscious using it as a purse. The purse did go together fast and easy, and I won't hesitate in making it again in more-subdued colors.

Wednesday, June 04, 2008

Fabric for Birdie Sling


Well, I bought some fabric for my next new purse, but I can't decide which fabric to use. See, I found two different fabrics sets for the purse, and since I couldn't decide I bought both. Should I make the purse from the brown and pink rose with contrast polka-dots, or should I use the pink and green floral fabric? Decisions, decisions...

I'll be using Amy Butler's Birdie Sling pattern, but I'm going to reduce the size a bit. I'll keep you posted.

happy sewing,
Ruth

Monday, October 08, 2007

A New Purse


As much as I like using my "Dorothy" bag, I am ready for a change. Time to sew a new purse! Voila! Here it is in all of its brown-ness:


Notice the little tag sewn to the outer pocket. Thank you, Heather, (my daughter) for the gift of the cute tags that match my fabric perfectly. The tag on the bag reads "euphoria."


Yes, I like pockets as mentioned in the past. I used a tutorial (there are several in blogland) for directions to sew the inside zippered pocket--a method I'd never done before--rather like welt pockets, which I have done before.

The magnetic snap is my favorite type of closure, and I'm thankful for the clearance sale I found a year ago where I purchased a number of these purse snaps.


Did I mention that I like pockets? The matching zippered pouch is really just another pocket. Think of it as a detachable pocket. Oh, these pouches are so fun to make! Again, I used another tag from Heather.


That's it for the purse, but take a look at Emily's hair! After wondering for so long if she would ever grow any hair, I am just loving her blonde curls. All sweetness, my baby! (Well, most of the time, anyway).


Until next time,
Ruth

Monday, September 10, 2007

A couple quick projects

A peek at what I've been doing in my sewing room...

A new clothespin bag for the clothesline. Not that I hang out clothes that much, like I should, but it looks pretty anyway. =) Made from vintage garage sale fabric. Squash yellow with little white roosters and milkmaids covering it. The curtain in my kitchen is made from the same fabric. It's a lot of fun.
A tweedy and velvety clutch purse for a friend's birthday present. I'm happy to say she was as excited to receive it as I was to make it. The super awesome tutorial I used is here.


And of course, my two favorite boys! They are the best!

Cheers, Jessica

Wednesday, August 15, 2007

Summer isn't over with yet...

Love my new purse? I think it's a lot of fun...a little scrappy and a little shabby chic with a few roses and a dash a sugar thrown in. Perfect for the rest of this summer.


Inspiration for the style came from Creative Little Daisy and all the pretty bags she makes. Her directions for a quilted patchwork purse are here.

Lately I've been reading the SewMamaSew blog and have found some of the best purse tutorials there. I learned how to make purse handles here and how to line a purse here.

With the leftover bits and pieces from my purse, I'm making a couple mini quilts with embroidered center blocks. I may hang them on the wall or give them away, or put them in my shop...not sure yet, but I'm enjoying making them.

by for now,
Jessica

Monday, July 16, 2007

The Dorothy Bag


I think I'm on a purse kick--sewing them, that is. The funny thing is that I'm still using my boring, old, brown leather purse that I used all last winter. Tomorrow I purpose to clean out my purse and move the stuff over to my new handbag---the Amy Butler "Dorothy" purse!

This project was so fun to sew! I've found the AB patterns to be a bit tedious in the instructions, but I love their style. I sewed this bag as instructed, but I added a magnetic snap instead of a velcro closure. I only wish I had also added a pocket to the interior. I can never have enough pockets in a purse, and so I made a matching zippered pouch to use as a detachable "pocket."

The fabrics I used came from my stash. If I recall, the interior fabric is from Amy Butler's Ginger Bliss line. I'm not sure about the outer fabric, though. To give the bag more stiffness, I did use an inner lining of heavy cotton twill. I like how this inner lining adds just a bit more weight to the purse but yet allows it to retain its softness.

Simply, I like everything about this bag!
Ruth


I think this pattern may be discontinued. At least I can't find it on the Amy Butler website.