Showing posts with label Tips and Techniques. Show all posts

Friday, July 24, 2009

Quick Tip: Marking Buttonholes

Sewing buttonholes can be a bit scary. First you have to get the buttonhole placements marked on the garment. Getting them evenly spaced can be a nightmare if you don't have the guide that comes with the pattern, or if you don't have one of those handy expandable buttonhole guide things. I don't have one of them, and I don't like math, so I sort of eyeball the spacing and then take a ruler to it to even out the distances between buttonholes. Anyway, my tip is not about spacing your buttonholes...though I'd love to hear how you do them, minus any math involved.

This tip is about marking your buttonholes on your garment....

Normally I just mark a "T" shaped mark for each buttonhole with sewing chalk; the line across the top marking the top where I start the buttonhole and the center line going down being the center of my buttonhole to be. Usually my chalk markings still show on the top, but I never let it bother me too much. They wash out after the first wash.

Yesterday though, I didn't want to get chalk marks on this lovely regency dress I was helping my sister-in-law make, and I had a stoke of genius (at least it felt like one!). To mark the buttonhole placement without marking on the dress, I put down a piece of 1/4 inch quilters tape along the edge of the dress back. All my buttonholes would butt up against the tape to start and thus all be exactly 1/4 inch away from the back edge. I then drew little marks on the tape to space the buttonholes apart evenly and show me where to start sewing them. Afterward, I pulled the tape off, and there were my perfectly spaced buttonholes and no chalk marks!

I'm telling you, this 1/4 inch tape comes in handy for so many things....

Blessings,
Jessica

Wednesday, July 08, 2009

Quick Tip: Keeping Gathers from Loosening and Falling Out

Last week I shared about getting your gathers even, but I forgot to take a picture of my other gathering tip....how to keep the gathers from loosening up and coming undone at the ends of your piece.

So you've pulled your basting thread up and pinned your gathers in place. One of the comments in my last post suggested tying the two threads together to keep the gathers from falling out, and that works really well too, but here's what I do, and it's even faster then tying the threads together.

Put a pin right at the end of your row of gathers and then take the long threads you pulled to create the gathers and wind them around the pin in a figure 8 pattern. Go around a few times to secure it.

Then, push the pin head down onto the threads wound around it and wala! Your gathers will stay in place. It's also easy to unwind and re-adjust if you find you need them looser or tighter as you continue to even the gathers out.

These particular gathers were on the ruffly sleeves of this vintage 1970s pattern.

I decorated the front with orange rick-rack from my garage sale stash.

The fabric is a vintage linen type material that also came from a garage sale. There was just enough to make this top for Marie!

Blessings
Jessica


Friday, June 26, 2009

Quick Tip: Getting Even Gathers

Ever have problems with the gathers on the front of a dress or on the top of a sleeve being bunched up all unevenly?

Mom taught me this little trick years ago, and it really helps. First sew your basting lines as the pattern directs and then gently tug your bobbin threads to pull up your gathers. Pull up the gathers till your piece is about the length it needs to be. Match up and pin the ends, the center, and any notches your pattern has.

Next, take a spare pin and use it like a guitar pick, running the end over the gathers between each pinned section. This will even up your gathers just like that!

Add more pins to keep the gathers in place and take it to your sewing machine. Sew as directed by your pattern. I keep a spare pin in hand and continue to run it over my gathers from pin to pin to as I sew.

Finished! Nice even gathers. Now go try it on your next project!

Blessings,
Jessica

Saturday, June 20, 2009

Ready to Assemble the Bodice

The bodice is ready to assemble, but not today---too many other things I need to do first: eat lunch, give Em a bath, practice my oboe, and attend a wedding. :)

In the short time I had for sewing today, I managed to get the bodice parts of the Vintage Sundress prepped and ready to assemble. This included sewing 8 darts, sewing and turning 2 straps, and sewing and turning 2 sash ties.


My favorite tool for turning tubes, both wide or narrow, is the Fasturn. The Fasturn works great for those teeny tiny spaghetti straps as well as for wide tubes.


The following pictures show how I usually sew darts. I'm not expert by any means, but this method works for me.

First of all, I mark my darts by clipping the dart "legs" and marking the top of the dart with a pin. I think you can see the leg clips in the picture. I drew lines to show where I will be stitching---hopefully my sewing is straighter than the drawn lines.


I then fold the fabric in half along the dart, matching the dart legs together. Using a sticky note, index card, or piece of paper (whatever I find handy on my sewing table), I place it along the stitching line and use it as a straight edge guideline as I sew. The trick is to sew along the straight edge, not through it. As I approach the top of the point, marked by the pin, I shorten my stitch length to next-to-nothing--1.0 or 1.5 on my machine-- and I sew off the fabric for a few stitches. This "knots" the thread, eliminating the need to back-stitch at the dart point, and thus eliminating unnecessary bulk. I've never had a dart come undone doing it this way.


The sewn dart on the inside:


The sewn dart from the outside, after pressing. No pucker!


This dress has a total of 8 darts: 4 on the outside and 4 on the lining. I am using batiste for the lining of the dress.


My excitement about finishing this dress is growing. I love to sew for long periods of time, and this sewing in short periods of time is about doing me in. I can't wait to put this bodice together--sigh--I really need to get going with the other things that must be done first.

Ruth : )

Friday, May 22, 2009

Making your Own Piping

One of our readers, Cheryl, asked about the piping on the Wonderland pillows I made:

"Jessica, Nice job on the piping! That is something I want to try this summer. Was it hard? What did you use to learn how to put the piping on? Did you have a pattern, or tutorial? I am sure it's probably harder than I am making it out to be.
I used to have a fear of sewing zippers, but not anymore. Maybe once I do piping, I won't fear that anymore."

Cheryl, below is the tutorial I used...I was surprised that it was actually easier than I thought it would be. I didn't practice on anything. I just jumped in! I think though, that a pillow would be an excellent thing to practice on. The only tricky part was the corners, but I love how this tutorial shows how to clip them to lay flat and then has you baste the piping on before sewing all three layers together. I also thought this tutorial did a good job of showing two methods to join the two ends of piping around a pillow.

How to Cover Cording to Create Your Own Piping from About.com

Let me know when you try this technique! I'm sure you'll love it once you try it!


Blessings,
Jessica

Monday, April 20, 2009

Fat Quarter Purse


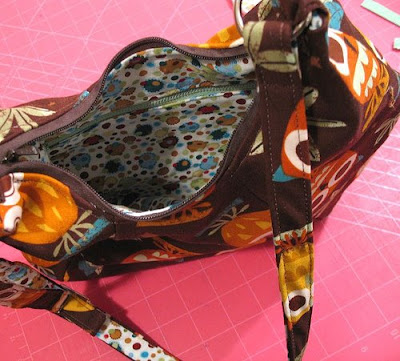
When I saw this cute purse pattern at wewilsons.blogspot, I decided that it would be the next purse I sewed. The purse is made from just 2 fat quarters. The purse, however, is smaller than I like, so if Ellen claims this, it's hers (let's see if she reads her mama's blog). Because I do like the style and shape, I may try enlarging the pattern and making another for me. We'll see.

lots of pictures here---including a picture tutorial of how I made the inside zippered pocket:


The instructions did not call for this, but I used an inner layer of canvas to give more body to the bag. I used canvas in the straps as well.


The instructions also did not call for an inside pocket, but I absolutely *need* at least one inside pocket in my purses. For the pocket, I cut two rectangles the same size as well as 2 layers of interfacing which I fused to the wrong side of the pocket pieces.


I used a vintage metal zipper from my stash, but since it was too long I had to use needle-nose pliars to shorten the zipper. It's fairly easy to just grab the metal zipper teeth one at a time and pull them off the zipper tape.


After deciding how long to make my pocket opening, I drew a rectangle on the wrong side of one pocket piece and then proceeded to sew the pocket to the purse lining, right sides together, and sewing on the drawn lines.


Next, I cut a slit through both fabric layers, clipping to the corners, and being careful not to cut through the stitching line.


I didn't take a picture of this step, but I pulled the pocket through to the wrong side of the lining and ironed it down. This takes some work to get the pocket to lie flat, but it is possible.


Here is the front of the lining with the finished opening, ready to sew in the zipper.


Wonder Tape-- this is great stuff! It is sticky on both sides, and you can sew through it without gumming up your machine. You can see where I applied the tape to both long edges of the zipper. Next I peeled the paper backing off and laid the zipper in place underneath the pocket opening.


To finish the pocket, I topstitched close to the edge of the rectangle opening. The wonder tape held the zipper firmly in place with no shifting---gotta love it!

Lastly, on the wrong side of the lining, I placed the second pocket piece against the first pocket piece, right side to wrong side and sewed around the edges. While sewing the 2 pocket pieces together, I had to be careful to hold the lining piece out of the way and sew only the pocket pieces. The pocket ends up with a clean finish on the inside, and the only stitches to be seen are around the zipper opening.