Sunday, July 26, 2009

McCalls 5804


~a new dress for Katie, my 19-year-old daughter~

The Pattern: McCall's 5804, View B

Fabric: Cotton--a beautiful print, not what I would have chosen but Katie loved the fabric when she saw it at Hancock's. She will get to do the ironing. :) The fabric suits Katie well, and I'm very pleased with the results.

Size: I started with a size 10 based on Katie's measurements, but it was much too big. I'm so glad I discovered this when I made a muslin of the bodice. You know, I rarely used to make muslins, and it's only been in recent years that I have. After much fitting and re-fitting, I finally got it right on this dress. I realized that I should have started with a size 6 and adjusted up from there instead of adjusting down from the size 10. The only place the size 10 fit was in the waist/ribcage and the hips. I pulled several reference books off the shelf and learned so much about fitting. Much to my surprise I found that I actually enjoyed the fitting process! I feel like the extra time and work involved was well-spent because of the knowledge I gained.

Construction Details: The dress is fully-lined, but I did not follow the instructions for the lining which have you line the bodice and waistband before attaching the skirt and skirt lining. Instead, I completely made the dress, sans sleeves, and I made the lining the same; then I attached them together at the neckline. Afterward, I did stitch-in-the-ditch in the waist seams to hold the lining to the dress. I did not topstitch the waistband as instructed.

The back of the dress opens with an invisible zipper. I'm so glad I have an invisible zipper foot for my machine--it holds the coils up and allows for close stitching. Before I bought the zipper foot, I used a pintuck foot which worked almost as well.

Changes made:
~Raised the neckline by 5/8 inch.
~Raised the armholes because the sleeves were binding. Raising the armholes helped because there was too much fabric there that was binding. Before I read about this in the fitting book I would have thought to lower the armhole (I tried it first, and it made the binding worse).
~Lengthened the hem by 2 inches. I would have made the skirt even longer, per Katie's wishes, but I didn't have enough fabric. Since Katie is short ("short people got no reason") the final dress length is fine.

Okay, I will post pictures of Katie in the dress in the next few days. It looks great on her!

thank you for reading,
Ruth


Friday, July 24, 2009

Quick Tip: Marking Buttonholes

Sewing buttonholes can be a bit scary. First you have to get the buttonhole placements marked on the garment. Getting them evenly spaced can be a nightmare if you don't have the guide that comes with the pattern, or if you don't have one of those handy expandable buttonhole guide things. I don't have one of them, and I don't like math, so I sort of eyeball the spacing and then take a ruler to it to even out the distances between buttonholes. Anyway, my tip is not about spacing your buttonholes...though I'd love to hear how you do them, minus any math involved.

This tip is about marking your buttonholes on your garment....

Normally I just mark a "T" shaped mark for each buttonhole with sewing chalk; the line across the top marking the top where I start the buttonhole and the center line going down being the center of my buttonhole to be. Usually my chalk markings still show on the top, but I never let it bother me too much. They wash out after the first wash.

Yesterday though, I didn't want to get chalk marks on this lovely regency dress I was helping my sister-in-law make, and I had a stoke of genius (at least it felt like one!). To mark the buttonhole placement without marking on the dress, I put down a piece of 1/4 inch quilters tape along the edge of the dress back. All my buttonholes would butt up against the tape to start and thus all be exactly 1/4 inch away from the back edge. I then drew little marks on the tape to space the buttonholes apart evenly and show me where to start sewing them. Afterward, I pulled the tape off, and there were my perfectly spaced buttonholes and no chalk marks!

I'm telling you, this 1/4 inch tape comes in handy for so many things....

Blessings,
Jessica

Thursday, July 23, 2009

Sewing For Children Contest

Today I received official notification that the Vintage Sundress won first place in the Sewing for Children Contest at Pattern Review. You can imagine my excitement! Second place went to Sandi for her beautiful smocked dress. Congratulations, Sandi, your dress is lovely!

Many thanks to Pattern Review for hosting the contest and to Sew Baby for sponsoring the oh-so-generous prize. I'm going to have so much fun shopping Sew Baby! Also, thank you to the PR members who voted for my entry, and thank you to all who read this blog. Everyone is so encouraging, and I do appreciate you all.

gratefully,
Ruth


Sewing for Children Large

Wednesday, July 22, 2009

Jalie 2794


This top is Jalie 2794, the "Sweetheart Top." I intended to make it for myself, but it just didn't work out for me---too small, and it was binding through the arms. All was not lost, however because the top fits Katie, and best of all, she likes it. So... Katie has a new top. :)

I think the reason the top was too tight on me is due to my fabric choice: a cotton-lycra knit with lots of stretch. I should have gone up another size or two. To make it fit Katie, I did have to take in the side seams another inch.

Construction changes: The Jalie instructions called for hemming the cap sleeves by 5/8". Ick. Double-ick, pressing and stitching a curved hemline. Instead, I made a band just like the neckline band and I sewed it on the sleeve hem. I like the look, and it was so easy to sew.


Also, based on reviews I read at Pattern Review, I raised the neckline by one inch.

I do hope to make this top again--but next time for me. I like the design details. Perhaps I'll try it in a not-as-stretchy knit next time.

Thanks for reading!
Ruth


Saturday, July 18, 2009

Cross Front Nightgown


I bought this fabric some time ago with the intention of making Emily a summer night gown. Well, summer will soon be over, and I finally sewed the nightgown! I think I've mentioned before that I'm not a fast sewist. :)

Pattern: Cross-Front T-Shirt; Ottobre 03/04 design #9
Fabric: Lightweight jersey knit from Hobby Lobby; the neck binding is knit ribbing.
Pattern sizes: 62-110; I made the size 104 for 4-year-old Em.

The nightgown started out as a t-shirt pattern, but I lengthened the side seams in an A-line cut and curved the hemline slightly. The sleeve hems and bottom hemline are finished with lettuce edging. This is only the second time ever that I've sewn a lettuce edging, and overall I'm pleased with the results. (Pictures are here of the my first attempt at sewing a lettuce edge--the red shirt about 1/2 way down the page). Pamela Erny, from Off-the-Cuff, once gave me detailed instructions for her method of "lettuce-ing," and really, I wonder why I don't do more of this edge finish. I'm sure my edges will never look as good as Pam's, though!

I plan on using this pattern to make several tops for Emily. The design with the cross-over front was fun to sew--and easier, in my opinion, than sewing a plain round neck with binding.

Thanks for reading,
Ruth


Ottobre 03/2004 Design #9


Thursday, July 16, 2009

Vintage Sheet Quilts Coming Soon

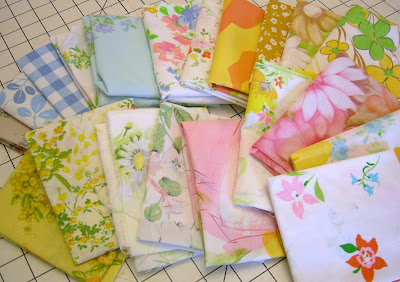
I just received my vintage sheet fat quarters from a swap I recently participated in at Rosey Little Things. Aren't they pretty??

Today I cut them all into 6 inch squares and combined them with the prints I already had....

Mom and I are going to combine our stashes of vintage sheet prints and make quilts! Emily needs a twin sized quilt for her bed, and I plan to make some baby quilts to share in my etsy shop.

Inspiration comes from these lovely quilts HERE. Eye candy!!!

Blessings,
Jessica


Wednesday, July 15, 2009

"Sorja" the Slim Fit T-Shirt

From the 01/2009 Spring issue of Ottobre, I made this t-shirt for Ellen. The fabric is a soft rayon knit from Hancock's, and Ellen picked it out last summer.

The pattern:
Design #34, "Sorja" slim-fit T-shirt
European Size 158

Changes I made: The pattern has long sleeves. I shortened them to short sleeves by using the given pattern for the sleeve cap but tracing a shorter sleeve from a Jalie pattern. The Jalie sleeve is curved at the hemline, and I ended up using the pink line for my cutting line.

This top is long! But this is fine, because Ellen prefers the long length. She wears it bunched up like the magazine pictures.


Ellen sure was in a goofy mood when I took the pictures! We had a fun time, even though the temperature was in the 90's.

Thanks for reading!
Ruth


photo from the magazine:


Added Note: About the fabric---Ellen spotted it at Hancock's and just had to have a shirt made from it. I tried to discourage her--too bright, too bold, too orange (I don't like orange)--but she loves the fabric. I'm glad I finally made the top because the fabric really does suit her.

Sunday, July 12, 2009

Purple 2-Piece


The day before a trip to Illinois with my older girls, I decided to take 4-year-old Emily with us. She didn't have a swimsuit, so I pulled out my Ottobre magazines and made her one. I used two patterns to create a 2-piece tankini top and "boy leg" bottoms. I like this type of bottoms because it provides more coverage than a traditional swimsuit. The fabric was bought about 3 years ago from Joann's. I highly recommend this style of swimsuit if you want something more modest than most swimsuits and if you want a 2-piece for ease of dressing and toilet breaks.

The tankini top is design #20 from the 02/2004 issue of Ottobre. It is a size 104, modified by lengthening the pattern and leaving off the bottom half. A ruffle is attached to the hemline.

The swimsuit bottom is design #35 from the same magazine issue. The pattern is actually for boys' swim trunks, but it works just as well for girls. I made no modifications to the swim trunk pattern.

I've always been a bit apprehensive about sewing swimwear, but after sewing this size 4 suit I realize it wasn't too difficult. I might just be able to try a more challenging swimsuit pattern someday.

Ruth


Wednesday, July 08, 2009

Quick Tip: Keeping Gathers from Loosening and Falling Out

Last week I shared about getting your gathers even, but I forgot to take a picture of my other gathering tip....how to keep the gathers from loosening up and coming undone at the ends of your piece.

So you've pulled your basting thread up and pinned your gathers in place. One of the comments in my last post suggested tying the two threads together to keep the gathers from falling out, and that works really well too, but here's what I do, and it's even faster then tying the threads together.

Put a pin right at the end of your row of gathers and then take the long threads you pulled to create the gathers and wind them around the pin in a figure 8 pattern. Go around a few times to secure it.

Then, push the pin head down onto the threads wound around it and wala! Your gathers will stay in place. It's also easy to unwind and re-adjust if you find you need them looser or tighter as you continue to even the gathers out.

These particular gathers were on the ruffly sleeves of this vintage 1970s pattern.

I decorated the front with orange rick-rack from my garage sale stash.

The fabric is a vintage linen type material that also came from a garage sale. There was just enough to make this top for Marie!

Blessings
Jessica


Monday, July 06, 2009

Quilt Top or Something Else?


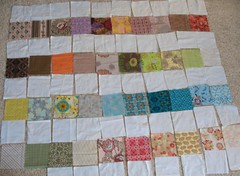
Today Ellen (my 13 year old daughter) and I were playing around with the 4o squares that I received from Art Gallery Fabrics last month, and we were trying to come up with a design for a lap top. The 40 squares represent an assortment of Patricia Bravo's designs. The fabrics are just beautiful.

I don't know--what do you think--which layout do you like best? Or do you have suggestions for something different? Maybe I should cut each block in half and try something new? The blocks are each 6.5" square, and I really don't want to add in any other prints. Perhaps instead of a quilt I should make a patchwork bag--decisions, decisions....

Ruth


quilt

quilt

quilt

Pattern Weights

A few weeks ago I showed this picture of my lovely stack of fabric, which has now turned into...


Voila! pattern weights!


Last year I made over 125 weights for the This-End-Up co-op, and I'm grateful to have the opportunity again this year. Weights will also be available in my Etsy shop if I get busy. :) I also have a few sewing projects lined up. Oh, and the new issue of Ottobre should be here any day! So much to sew....

happy day,
Ruth